Using the Fraud tab
Click on the Fraud tab to get access to the antifraud profile management tool homepage.


You can select the language of your choice (EN, FR) in the top-right corner.
Webshop list
The top-hand part of this page contains the list of webshops you have access to.
You can extend this section to select another webshop by clicking on
the  icon.
icon.
A data entry field at the top of this area makes it possible to filter webshops using all or part of their names or ID.
Click on one of the webshops to select it and display its profiles.
Main part
The menu at the top of this part enables you to access the features for administering the profiles and lists of the selected webshop.
 buttons that will give you access to detailed
information about the elements located next to them.
buttons that will give you access to detailed
information about the elements located next to them.The actions you can take depend on the role(s) assigned to your Merchant Extranet profile.
Pagination and multiple selection
Pagination
At several places of the interface, you may find tables the elements of which are shown across several pages when the content requires it. Buttons for navigating through the pages are then displayed.
Multiple selection
When list elements can be selected, a checkbox in the header of the list enables you to select or deselect all of them with a single click, including those that may be on other pages.

When multiple elements are selected, some buttons displayed at the bottom of the table make it possible to perform actions on the whole selection.
Administering antifraud profiles
Click on Manage shop profiles in the menu bar to access this section.
Profile list
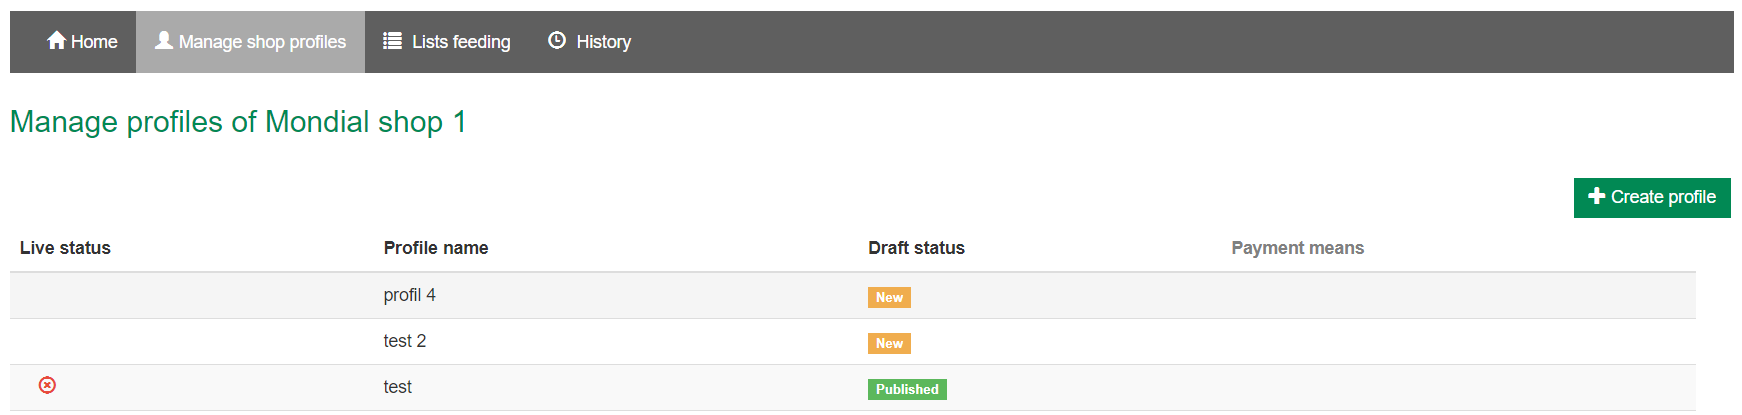
The homepage of this section provides an overview of the webshop profiles in the form of a list.
If you have subscribed to the option to use the antifraud controls before the authentication, then a tab bar allows you to switch between the before authentication profile list and before authorisation profile list:

 profile is inactive profile is inactive |
 profile is active profile is active |
The live status of a profile is inactive:
- if the profile has never been published
- if the profile has been deactivated manually
- or if the profile has been automatically deactivated by the activation of another profile that conflicts with the associated means of payment.
For the distributor's profile not to be used, it is preferable to always have an active default profile.
| Status | Publication status |
|---|---|
 |
The profile has been created but never published. |
 |
The profile has been published and is used to evaluate transactions if it is active (see above). |
 |
The profile has been modified since it was last
published. It must be republished for the changes to be taken
into account for transaction evaluation. Important :
this does not affect the functioning of the published version of
the profile, which continues working the same way as
before. |
A profile consists of two entities: a working version and a published version.
The work version is one that you can modify and save as much as you like without any effects on the webshop transactions. It can be considered as a profile draft. When a new profile is created, it is actually a working version.
Once you are satisfied with the changes made to the working version, you can publish it to create the published version. This version of the profile is used to evaluate transactions.
The Payment means column shows the means of payment associated with a profile.
Profiles can be customised for specific means of payment. This column summarises them.
The means of payment over a coloured background are those associated with the published version of the profile.
The means of payment over a grey background are those that are only present in the working version, and which are thus inactive for transaction evaluation.
In the following example, Mastercard and Visa are associated with the published profile and CB is only in the working version:

You can click on the blue column header to sort the list according to the criterion.
Clicking on a profile of the list enables you to view and edit the details of its configuration.
Profile life cycle
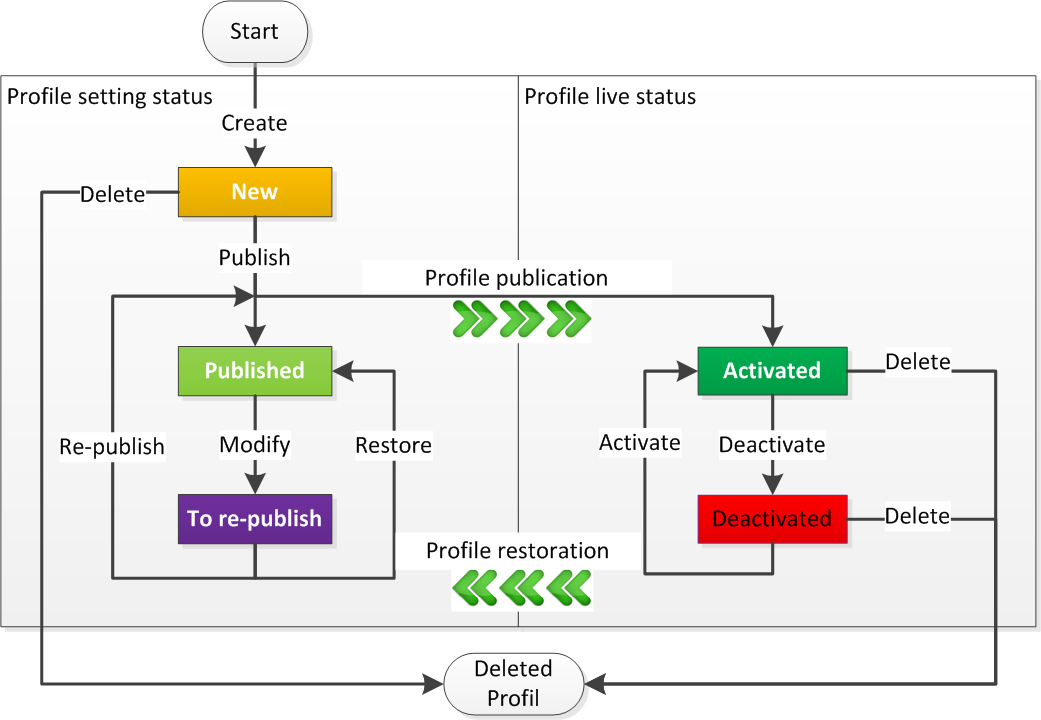
Example of a profile life cycle:

Creating a profile
Click on the button to create a new profile. The creation options are as follows:
 button to create a new profile. The creation options
are as follows:
button to create a new profile. The creation options
are as follows:- Go-No-Go profile
If this option is authorised by the distributor, select the Go-No-Go profile option in the Create profile menu-button list. You will be given access to the new profile creation page.
or
- Select Copy existing to create a new profile from a profile
already existing in the webshop. A new window will pop up and let you
choose the profile to be copied.
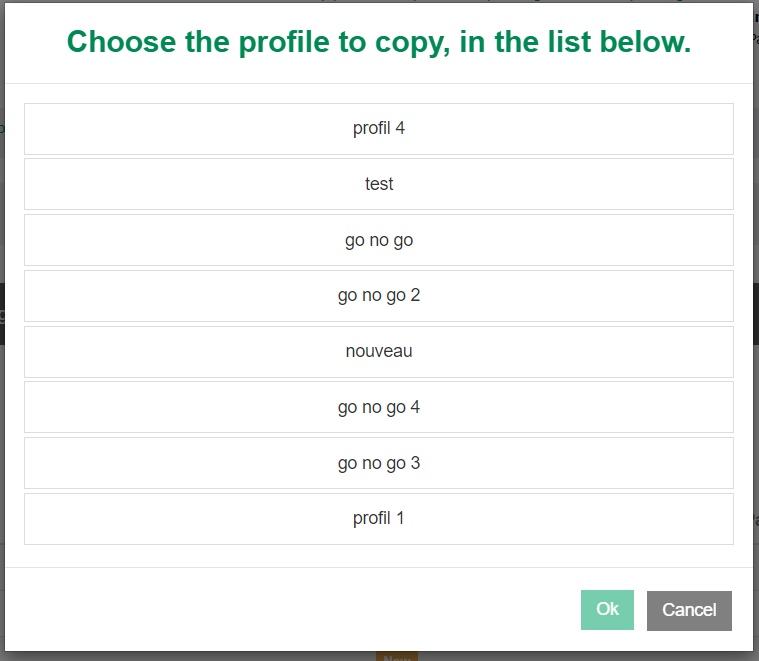
Having chosen the profile to be copied, you will get access to the profile creation page.
or
- From a profile template
As with copying an existing profile, a popup window allows you to choose, from a list of available profile templates, the one that will serve as the basis for the new profile created.
You will then be taken to the profile creation page:
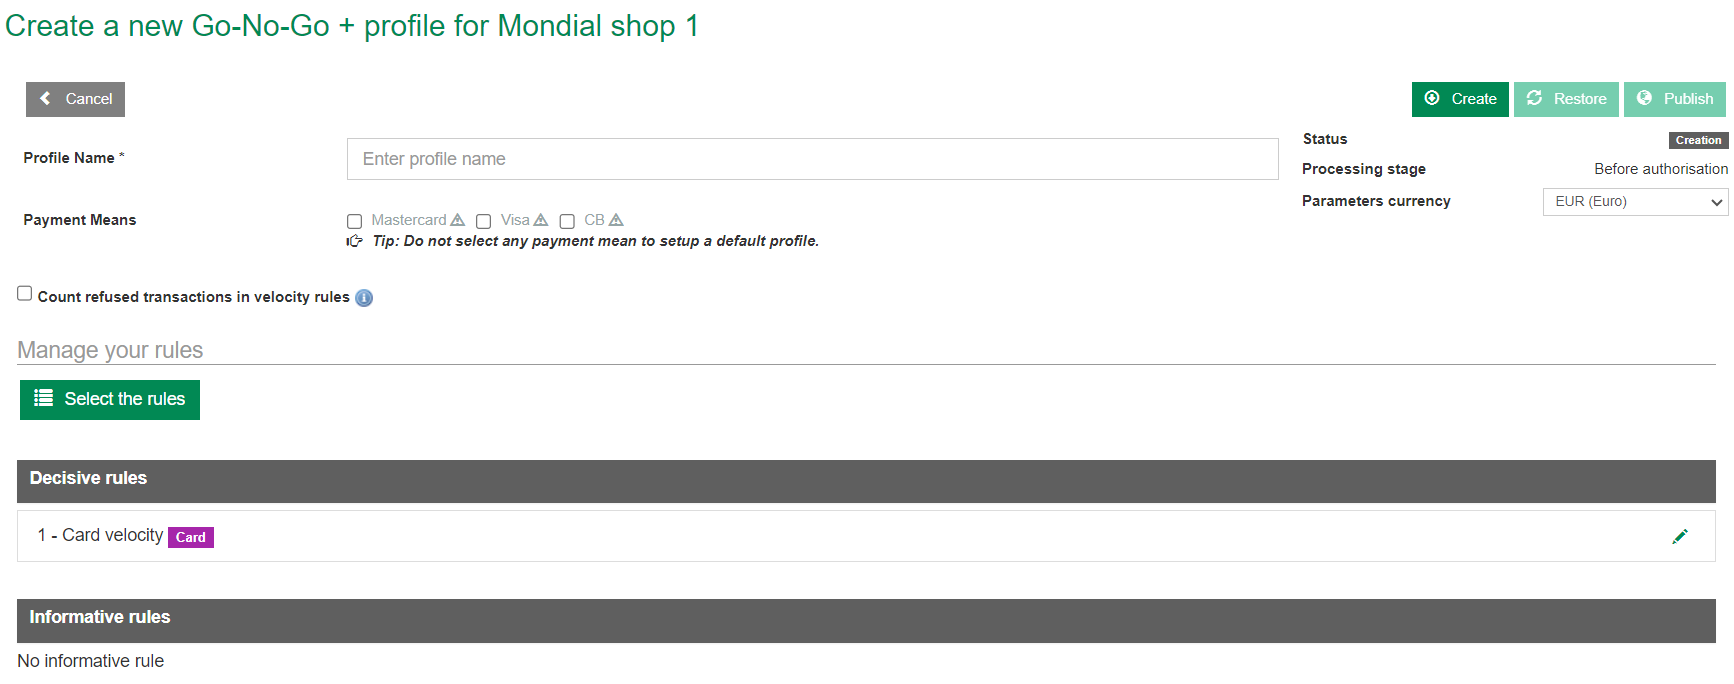
- Profile name:
The profile name must be unique for a given webshop and can consist of a maximum of 30 characters among the following: A-Z, a-z, 0-9, _ (underscore) and space.
- Means of payment:
You can choose whether the profile must apply to one or more specific means of payment. Check the boxes of the required means of payment. The list of the available means of payment depends on the contracts that are active on the webshop and configured in the Merchant Extranet.
Tip: default profilesIf the profile must apply to all means of payment, it is a default profile; therefore, there is no need to check anything.
The fact that a means of payment of the list is greyed out and tagged indicates that it is already selected in another profile. You can still check it if you wish. It will then be removed from the other profile. A warning message is displayed to remind you of this when you check the means of payment:
 Attention: only one profile for a given means of payment
Only one active profile can be associated with a given means of payment. The configuration interface guarantees this by automatically deleting the means of payment from the other profiles if there is a conflict with a newly edited profile. At the time of its publication, this profile will be fully associated with the means of payment concerned.
 indicates that it is already selected in another
profile. You can still check it if you wish. It will then be removed
from the other profile. A warning message is displayed to remind you of
this when you check the means of payment:
indicates that it is already selected in another
profile. You can still check it if you wish. It will then be removed
from the other profile. A warning message is displayed to remind you of
this when you check the means of payment:- Count refused transactions in velocity rules
Check this option to account for refused transactions in the counters (in addition to accepted transactions).
- Parameters currency
If a webshop has contracts that involve means of payment in multiple currencies, you can choose, in the details of a rule, the currency that is used to set amounts.
IMPORTANT: all transactions can be evaluated by a profile regardless of their respective currencies. Indeed, this parameter does not mean in any way that the profile only applies to the transactions the amounts of which are given in the chosen currency.If the transaction uses a currency other than the one configured in the profile, currency conversion is performed.
- Profile rules
The Manage rules section in the creation profile page enables you to choose the rules that must be applied as part of the profile. See the 'Administering rules in profiles' section for further details.
The profile is saved when the user clicks on the  button. At this moment, the profile is not active
yet. It will have to be published (see the 'Editing and publishing a
profile' section).
button. At this moment, the profile is not active
yet. It will have to be published (see the 'Editing and publishing a
profile' section).
The  button makes it possible to cancel the creation of
the profile and to go back to the webshop profile list.
button makes it possible to cancel the creation of
the profile and to go back to the webshop profile list.
Editing and publishing a profile
The profile editing page is almost identical to the creation page. In editing mode, the name of the profile cannot be modified.
- Profile status
A section on the right-hand side of the page provides details about the status of the profile:
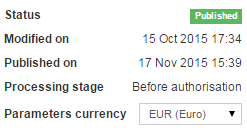
This section includes the status (see the 'Profile list' section), the publication date and the settings currency. The modification date corresponds to the date on which the work version was saved for the last time.
- Actions available in editing mode
Action Description 
Saves the changes made to the working version. This operation does not publish the changes. For this purpose, you will have to use the "Publish" button. 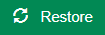
Restore a profile the working version of which has been modified, in the state it was in the last time it was published. This action is only available if the profile has been published and has been modified ever since (its status is then "To be republished".).
Deletes an unpublished profile. This action can no longer be accessed from this page if the profile has been published. You will have to view the published version of the profile to delete it.
Publishes the working version of the profile, which is then in effect for transaction evaluation. The orange colour indicates that this action may have consequences on the webshop transactions. Click on
 to be taken back to the profile list.
Click on
 to view the published version of the profile if
need be.
to view the published version of the profile if
need be.
Viewing a published profile
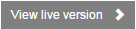
From the profile editing page, you can view the published version using
the button.
The following page displays:
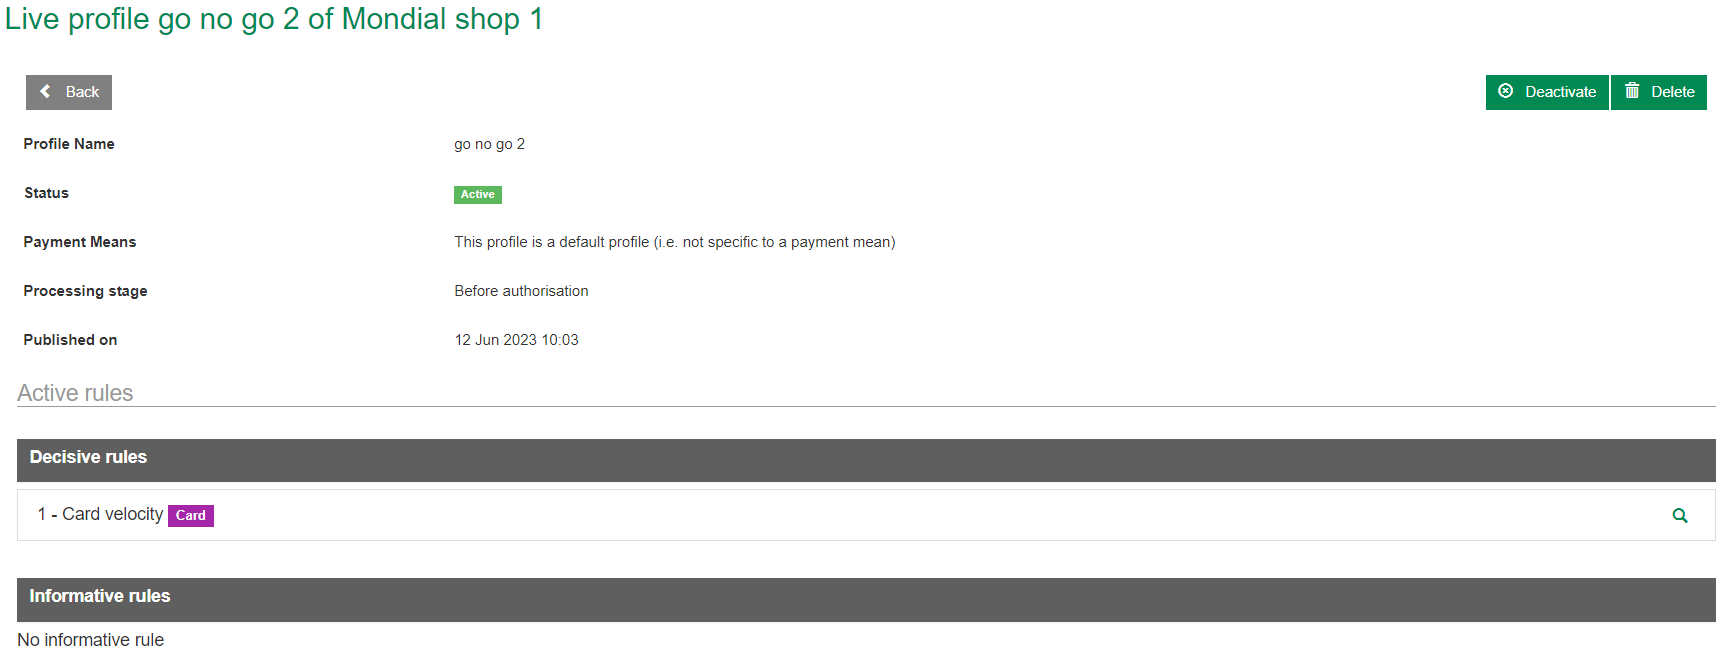
This screen lets you view the details of the published profile and its rules.
- Actions that can be performed on a published profile
Action Description 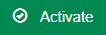
Activates the inactive published profile. This profile will then be in effect for transaction evaluation.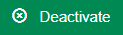
Deactivates the inactive published profile. This profile will then no longer be in effect for transaction evaluation.
Deletes a published profile. The orange colour indicates that this action may have consequences on the webshop transactions.
The
button takes you back to the working version of the
profile.
Activating/deactivating a profile
To activate or deactivate a published profile, you must go to the page where you can view its published version:
- choose the profile to activate or deactivate in the webshop's profile list
- then click on in the profile details
- you will then have access to the or button depending on the profile's activation
status.
To activate an unpublished profile, you only need to publish it.
Deleting a profile
To delete a published profile, like for activation and deactivation, you must go to the page where you can view the published version of the profile (see the 'Activating/deactivating a profile' section).
You will then be able to delete it using the button.
To delete an unpublished profile, access its working version (see the
'Editing and publishing a profile' section) then click on the button.
Administering rules in profiles
Adding or deleting a rule
The 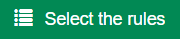 button on the profile working version screen (see the
'Editing and publishing a profile' section), displays a pop-up window that
makes it possible to activate rules in decisive or informational mode, or
to deactivate them:
button on the profile working version screen (see the
'Editing and publishing a profile' section), displays a pop-up window that
makes it possible to activate rules in decisive or informational mode, or
to deactivate them:
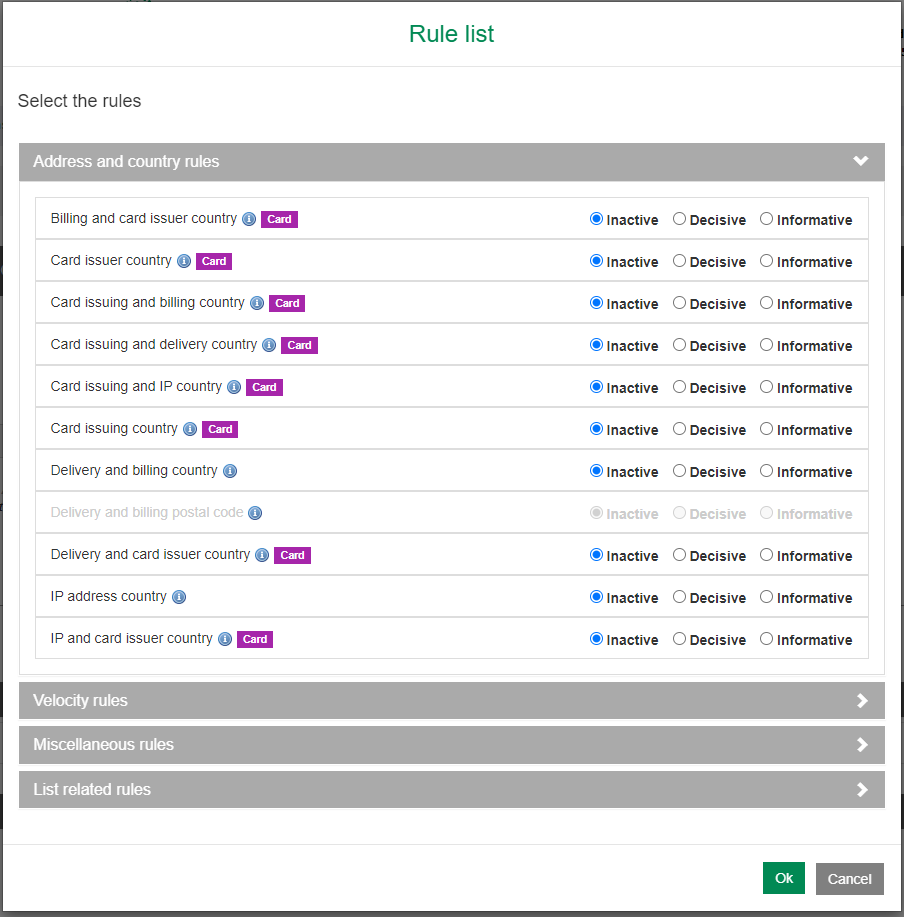
When you are done with the selection, click on Ok to validate your choices.
Ordering and configuring rules
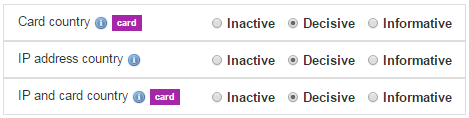
When clicking on the profile rules, you will see buttons that make it possible to perform actions on them.

- Available actions:
Action Description 
These buttons make it possible to order the execution of rules. 
This button makes it possible to modify the content of configurable rules if need be. Click on this button to delete a rule from the profile without using the rule selection pop-up window. 
This button makes it possible to convert an informational rule into a decisive one. 
This button makes it possible to convert a decisive rule into a informational one.

Please refer to the next sections for detailed rule configuration.
Filtering rules per means of payment
Some rules are related to a given means of payment (ex: SDD) or means of payment type (ex: cards). For instance, the card velocity can only be applied for payment cards (CB, VISA, MASTERCARD, AMEX) and the IBAN velocity can only be applied to a SDD payment.
When configuring the profile, the displayed rules are filtered according to the means of payment to which you subscribed. So if you did not subscribe to a given means of payment or means of payment type, you will not be able to use the rules restricted to it.
When a rule only applies to a means of payment (type), a label is dispayed next to it:
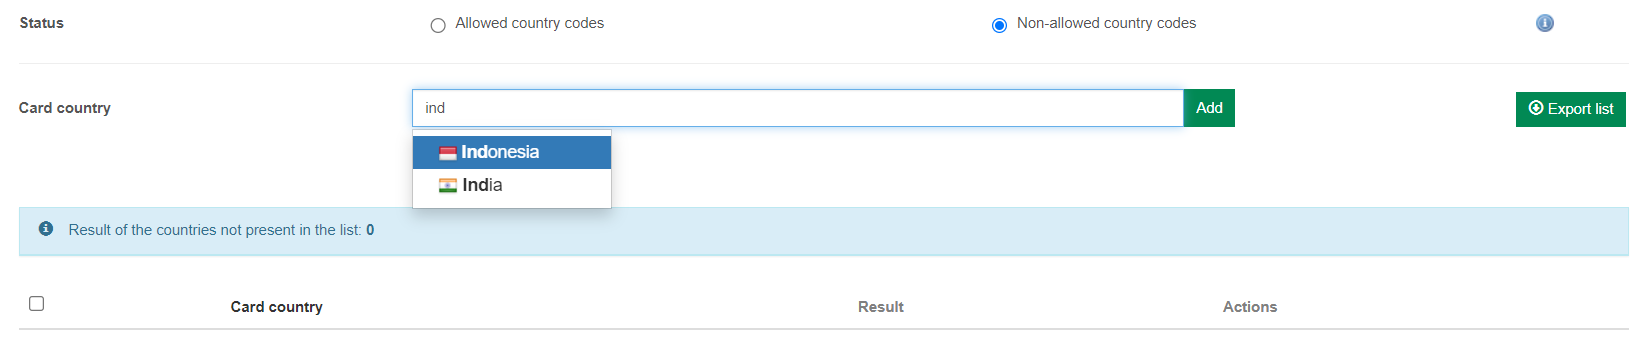
Configuring geolocation rules: addresses and countries
Card issuer country
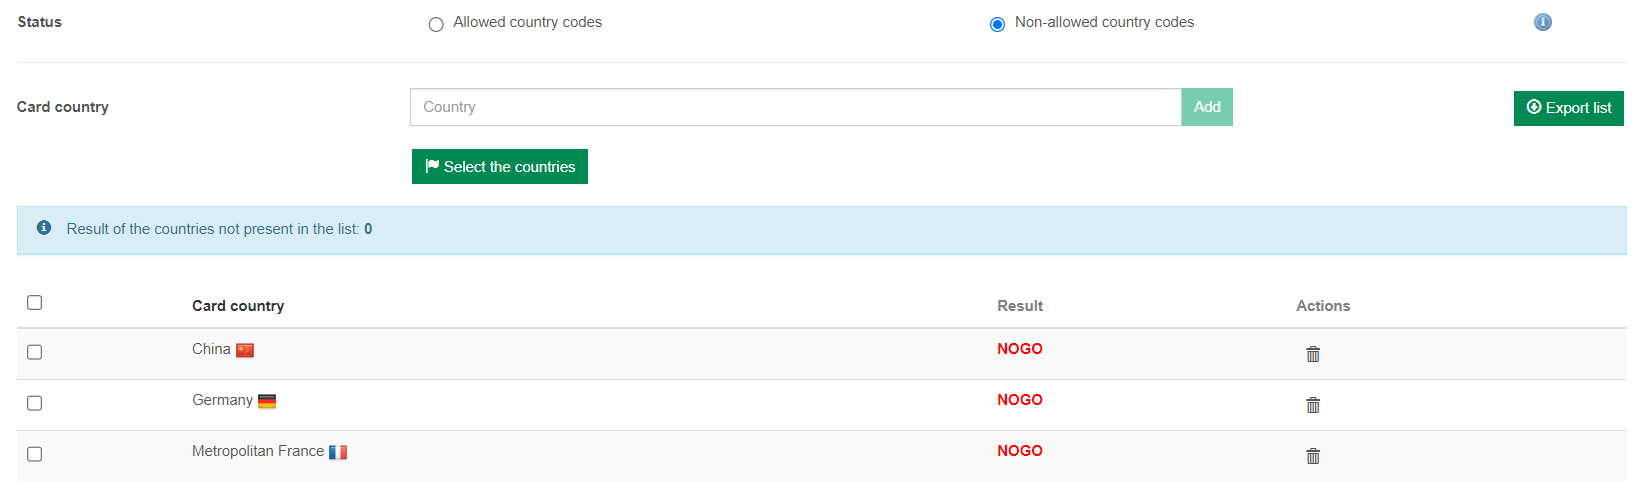
This section makes it possible to configure the list of the countries that the rule authorises or prohibits. This list can be displayed across several pages. The Result field corresponds to the result of the rule for the concerned country.
The Status radio buttons make it possible to specify whether the list that follows is a list of authorised or prohibited countries.
The Card country field makes it possible to add a country to the list by manually entering its name into the field (autocompletion is possible).
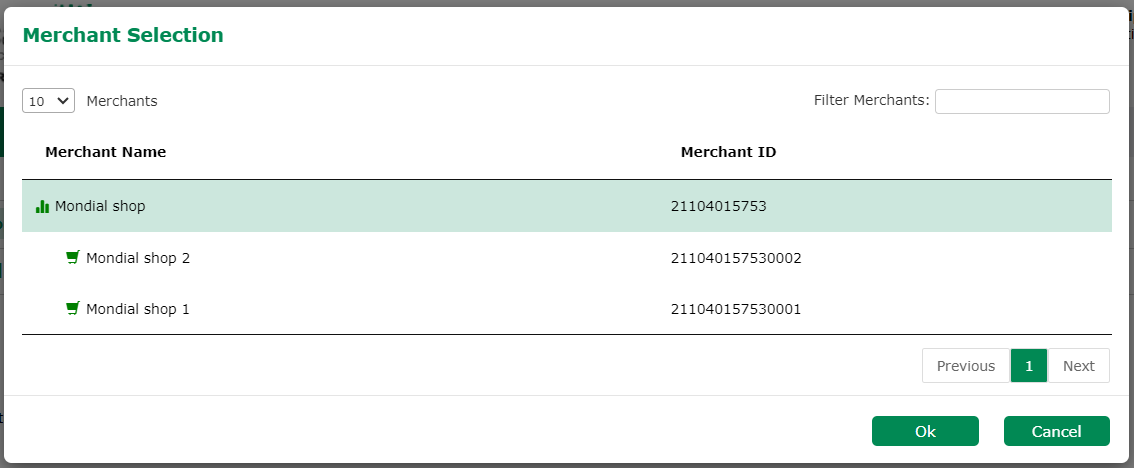
The  button displays a pop-up window that makes it
possible to select one or more countries from a list:
button displays a pop-up window that makes it
possible to select one or more countries from a list:
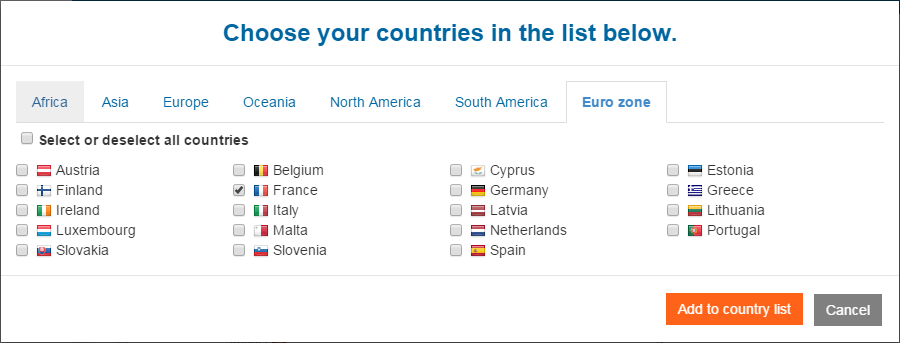
When manual data entry is in progress, the list is filtered accordingly, which makes it possible to see whether the country being entered is already on the list:
You can export the list into a CSV file by clicking on the  button. This creates a file which contains all the
items of the list and is automatically downloaded via browser.
button. This creates a file which contains all the
items of the list and is automatically downloaded via browser.
For more details on the CSV file contents, please refer to the following section: 'Appendix list export file format'.
IP and card issuer country
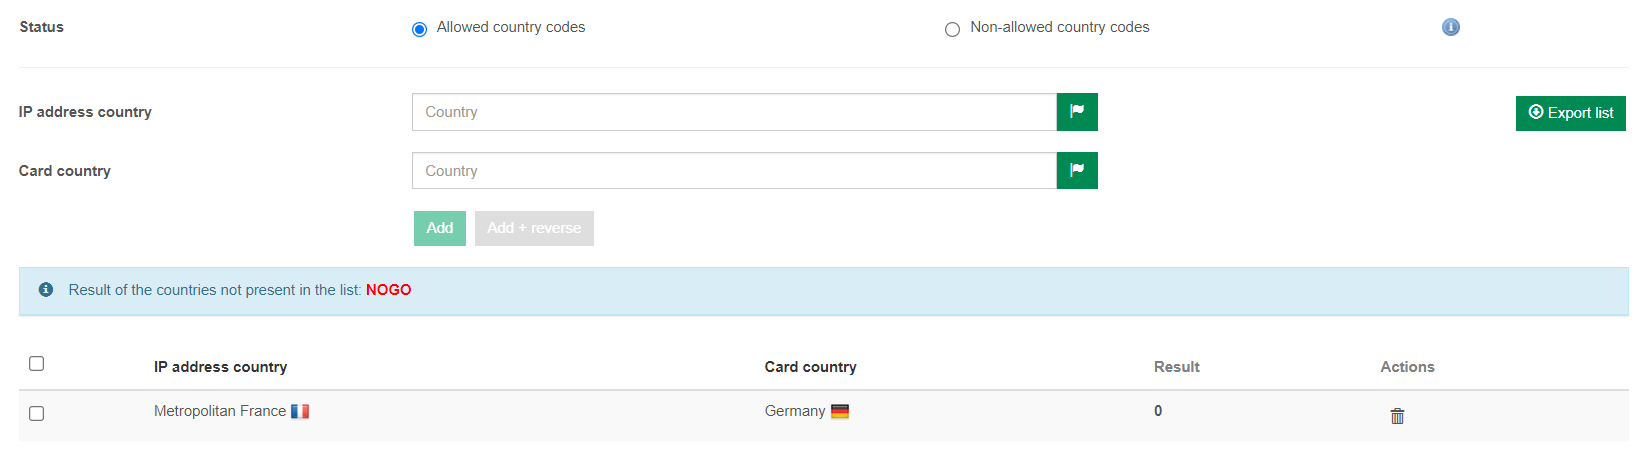
This section makes it possible to configure the list of the country combinations that the rule authorises or prohibits. The Result fied corresponds to the result of the rule for the concerned country.
The Status radio buttons make it possible to specify whether the list that follows is a list of authorised or prohibited country combinations.
The IP address country field makes it possible to manually enter the IP address country of the combination to add to the list.
You can specify a list of IP addresses right away using the selection
pop-up window. This window is accessible through the  button on the right-hand side of the data entry area.
In this case, once the list is selected, "country list" is displayed in
the data entry area.
button on the right-hand side of the data entry area.
In this case, once the list is selected, "country list" is displayed in
the data entry area.
The Card country field makes it possible to specify the card country of the combination to add to the list; it works in the same way as the IP address country field.
After entering the data either manually or through the pop-up window,
you must click on the  button to add the selected country combinations to
the list.
button to add the selected country combinations to
the list.
Alternatively, clicking on the  button makes it possible to add the combinations and
their reverse orders to the list. For instance, for the IP address
country = France and Card country = Belgium, this button will
add France/Belgium and Belgium/France to the combination list.
button makes it possible to add the combinations and
their reverse orders to the list. For instance, for the IP address
country = France and Card country = Belgium, this button will
add France/Belgium and Belgium/France to the combination list.
When manual data entry is in progress, the list is filtered accordingly, which makes it possible to see whether the combination being entered is already on the list. This list can be displayed across several pages.
You can export the list into a CSV file by clicking on the button. This creates a file which contains all the
items of the list and is automatically downloaded via your browser.
For more details on the CSV file contents, please refer to the following section: 'Appendix list export file format'.
Other rules
The configuration is done in the same way for many rules:
Configuring velocity rules
Card velocity

The Period fields make it possible to specify the periods over
which the number of transactions and the amount of transactions are added
up for the card concerned. You can specify these times in hours, days or
weeks using the  buttons.
The Maximum number of transactions field makes it possible to specify the maximum number of transactions authorised over the period.
The Maximum cumulated amount field makes it possible to specify the maximum cumulative amount of the transactions over the period. The currency in which the cumulative amount is given is indicated in front of this field.
It is not mandatory to specify both a maximum cumulative amount and a maximum number of transactions. One of the two is enough.
Similarly, it is not mandatory to set the maximum number of transactions and the maximum cumulative amount. The setting of one of the two is enough.
Other rules
The configuration is done in the same way for many rules:
| You would like to configure the following rule: | Please refer to the settings of the following rule: |
|---|---|
|
Card velocity |
Configuring miscellaneous rules
Cap collar amounts

The Minimum amount field makes it possible to specify the authorised minimum amount for a transaction. The currency in which the minimum amount is given is indicated in front of this field.
The Maximum amount field makes it possible to specify the authorised maximum amount for a transaction.
3-D Secure authentication

The Non-allowed status list is updated in the same manner as for the IP address reputation list.
This list only shows the 3-D Secure statuses that risk evaluation functions can filter. Notably, the CANCEL or BYPASS statuses are not on it. The distributor may impose 3-D Secure status acceptance rules upstream of fraud risk management checks. Therefore, some transactions having certain statuses of this list might be interrupted even before a fraud risk management check can be performed. For further details about 3-D Secure statuses, please refer to the holderAuthentStatus field in the data dictionary.
Other rules
The configuration is done in the same way for many rules:
| You would like to configure the following rule: | Please refer to the settings of the following rule: |
|---|---|
|
Card issuer country However, please keep in mind that
the Commercial card (and card country) rule is not eligible
for the advanced configuration mode. |
|
These rules require no specific configuration. |
Configuring list rules
Populating lists
List rules require no specific configuration.
However, activating a list rule in a profile is not sufficient; you must also manage the list itself. To do so, three options exist:
- adding elements in the list using Office Batch or
- adding elements in the list using Office (M2M) SOAP or JSON or
- using the Lists feeding tab.
Follow the procedure below to populate lists using the Merchant Extranet:
Click on the Lists feeding tab.
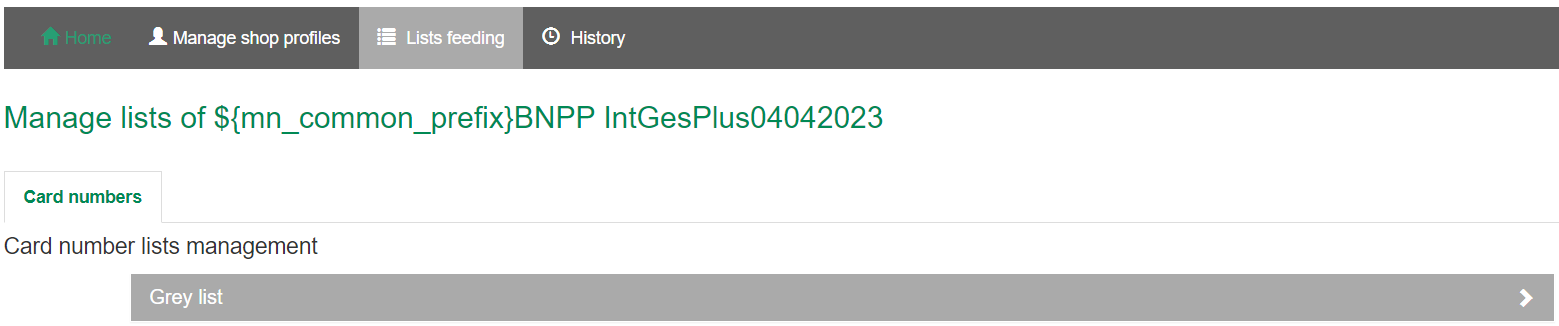
By accessing this section you gain access to the lists at your disposal: they vary according to the offer you have subscribed to. Please consult the list of rules for a complete list of existing list rules.
When editing a list, you can:
- add a value to the list and specify a reason for the addition
- delete an entry from the list
- or move an entry from a greylist to a blacklist
Adding a value to a list
You must enter the value you want to add to a list into the appropriate data field.
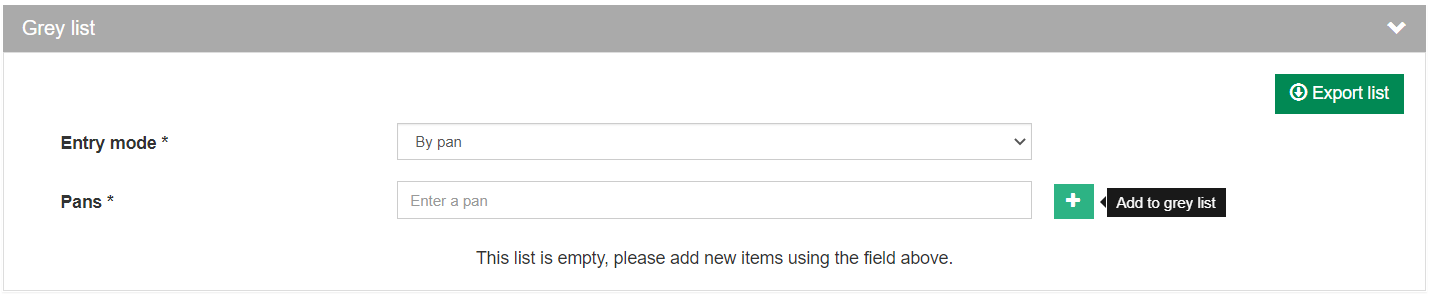
A click on the  button displays a contextual window that makes it
possible to select a reason for adding the value.
button displays a contextual window that makes it
possible to select a reason for adding the value.
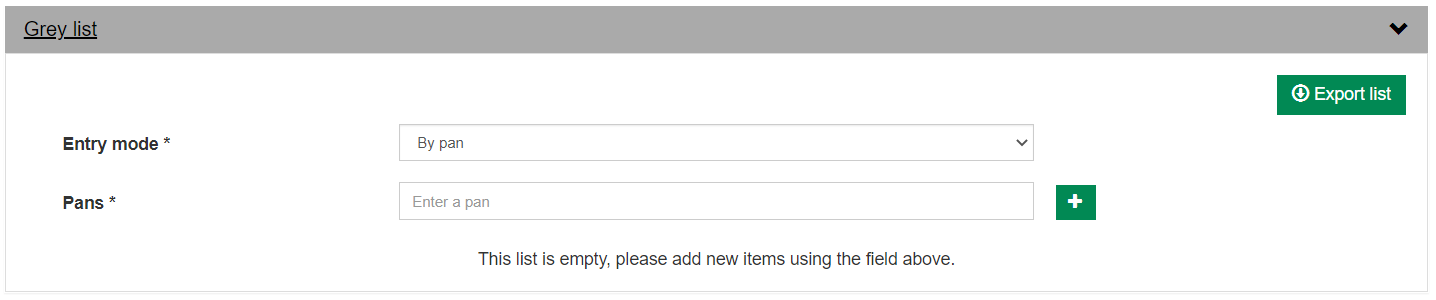
Adding a value to the card numbers list
The management of card numbers on blacklists, greylists or whitelists is different from the management of other lists.
You can add a card number:
- using the transaction reference linked to the card number
- using the card number
After selecting the entry mode using a combobox, you will be able to enter a token, a card number or a transaction reference on the screen.

Adding card numbers by transaction reference can be done by using either transaction references (Mercanet 2.0 primary key) or transaction identifiers and dates (Mercanet 1.0 primary key).
Adding card numbers by token can only be done if you have the "Merchant Token" option.
Selecting a reason to add an item to a list
Having clicked on the button, select the reason in the popup window then
click on OK, and the item will be added to the list.
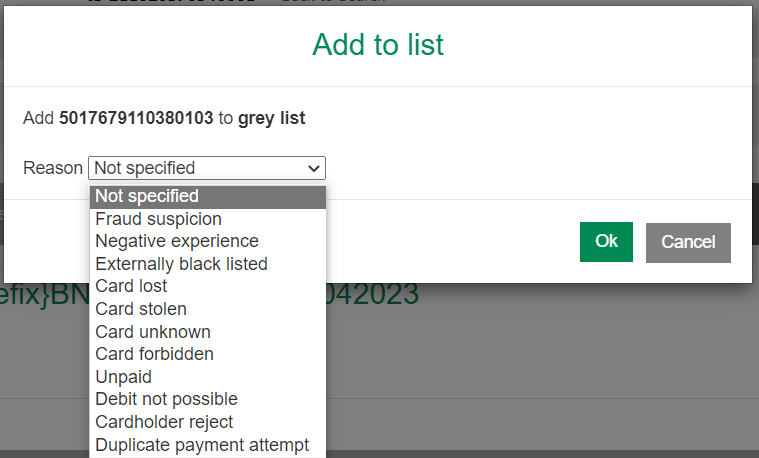
Adding a reason may prove handy later (for example to add a given customer ID to a whitelist). The reasons can be chosen from predefined sets that suit each type of list. But you may also decide to keep the "Not specified" default version.
The reasons are displayed next to the items:

They are identical for greylists and blacklists. Here is a summary of these reasons:
| List type | Reasons for whitelists | Reasons for blacklists and greylists |
|---|---|---|
| E-mail addresses | Unspecified VIP Trusted e-mail
address B2B customer |
Unspecified Fraud
suspicion Negative experience Is on an
external blacklist General suspicion Unknown
e-mail address Non-payment Failed
debit Chargeback Multiple payment attempts
|
| IP addresses | Unspecified VIP B2B customer Trusted
IP address |
Unspecified Fraud
suspicion Negative experience Is on an
external blacklist General suspicion Unknown
IP address Non-payment Failed
debit Chargeback Multiple payment attempts
|
| Postal codes | Unspecified Positive
experience |
Unspecified Fraud
suspicion Negative experience Is on an
external blacklist Unknown postal code General
suspicion |
| Customer IDs | Unspecified VIP B2B customer Trusted
customer ID Is part of a special action |
Unspecified Fraud
suspicion Negative experience Is on an
external blacklist General
suspicion Non-payment Failed
debit Chargeback Multiple payment attempts
|
| Names | Unspecified VIP B2B customer Trusted
name |
Unspecified Fraud
suspicion Negative experience Is on an
external blacklist General
suspicion Non-payment Failed
debit Chargeback Multiple payment attempts
|
| Card numbers | Unspecified VIP B2B customer Trusted
card Travel key card |
Unspecified Fraud
suspicion Negative experience Is on an
external blacklist Lost card Stolen
card Unknown card Prohibited
card Non-payment Failed
debit Chargeback Multiple payment attempts
|
| Phone numbers | Unspecified VIP B2B customer Trusted
phone number |
Unspecified Fraud
suspicion Negative experience Is on an
external blacklist General suspicion Unknown
phone number Non-payment Failed
debit Chargeback Multiple payment attempts
|
| BIN ranges | Unspecified Trusted BIN range |
Unspecified Fraud
suspicion Negative experience Is on an
external blacklist General suspicion |
| BIC | Unspecified |
Unspecified Fraud
suspicion Negative experience Is on an
external blacklist General suspicion |
| IBAN | Unspecified VIP B2B customer Trusted
IBAN |
Unspecified Fraud
suspicion Negative experience Is on an
external blacklist General suspicion Failed
debit Multiple payment attempts |
| Mandates | Unspecified VIP B2B customer Trusted
mandate ID |
Unspecified Fraud
suspicion Negative experience Is on an
external blacklist General suspicion Failed
debit Multiple payment attempts |
Exporting a list
You can export a list into a CSV file by clicking on the  button. This creates a file which contains all the
items of the list and is automatically downloaded via browser.This creates
a file which contains all the items of the list and is automatically
downloaded via your browser.
button. This creates a file which contains all the
items of the list and is automatically downloaded via browser.This creates
a file which contains all the items of the list and is automatically
downloaded via your browser.
For more details on the CSV file contents, please refer to 'Appendix list export file format'.
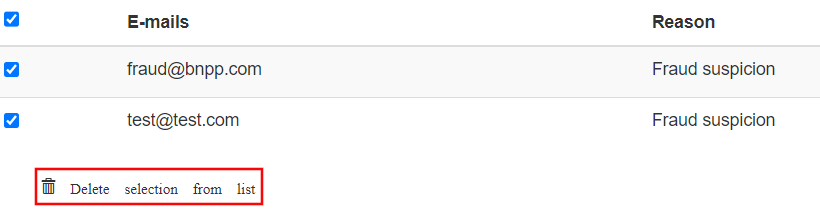
Deleting a value from the list
It is also possible to delete items from the list, e.g. if they are not valid any more or were added by mistake:
- select one or more values to delete from the list by checking the boxes next to the appropriate items
- then click on the Delete selected entries button.
To avoid deleting an item by mistake, you must click on Confirm in the confirmation window.
Moving a value
Every greylist offers the possibility to move a selected entry to the appropriate blacklist e.g. if the severity of a case increases. This spares you the effort to delete an appropriate entry from the greylist and to re-enter it on the blacklist. The procedure is as follows:
- select one or more values to move from the greylist to the appropriate blacklist by checking the boxes next to the required items
- then move them using the Move selected item to the blacklist button.
To avoid deleting an item by mistake, you must click on Yes in the confirmation window.
History of actions on the interface
A log of the modifications made through the interface is displayed in the History tab.
This section lists all the changes on your profiles and also the ones having an impact on your fraud configuration: publication of a template profile or the association to a shared group/list. Changes on the webshop’s lists (e-mail lists, name lists, etc.) are not logged.
Table of modifications
When you arrive on the modifications page, the table is not filtered and contains all the changes related to the webshop, from the most recent to the oldest.
On the top of the page, different criteria are displayed to filter the modification logs: a minimum date, a maximum date, a user name or a log type (merchant profile, template profile or association).
After clicking on the  button, the application reloads the table with the
filtered data.
button, the application reloads the table with the
filtered data.
Each line in the table shows the date on which the action was performed, the user who performed the action, the modified entity and a brief description of the action.
Click on the  icon to compare the object state before and after the
modification.
icon to compare the object state before and after the
modification.
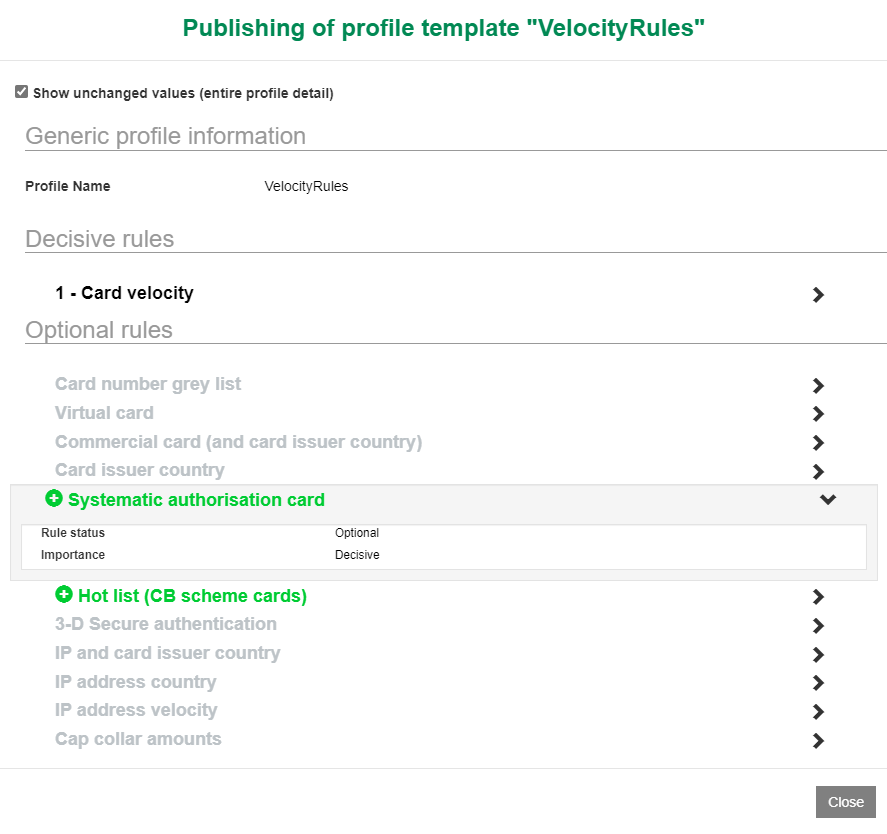
Details of the modifications
Merchant profile and profile template
After clicking on the  icon, a popup displays, showing a comparison between
the profile before and after the changes. By default, only the
modifications are displayed, but it is possible to show the unchanged
values also by clicking the Show unchanged values (entire profile
details) checkbox.
icon, a popup displays, showing a comparison between
the profile before and after the changes. By default, only the
modifications are displayed, but it is possible to show the unchanged
values also by clicking the Show unchanged values (entire profile
details) checkbox.
The comparison is made up of three parts:
- general information about the profile: name, means of payment, currency
- list of decisive rules
- list of informative rules
Modification on a rule
A colour code is used for rule modification:
| Colour | Meaning |
|---|---|
The rule name is in red and is preceded by the
 symbol. symbol. |
The rule was removed from the profile. |
The rule name is in green and is preceded by the
 symbol. symbol. |
The rule was added to the profile. |
The rule name is in orange and is preceded by the
 symbol. symbol. |
The rule was moved in the profile, which means its mode has changed (from decisive to informative and vice versa) or that it is decisive and its execution rank has changed. |
| The rule name is in black. | The rule content has changed. |
| The rule name is in grey. | The rule has not changed (only visible when the proper checkbox is ticked). |
For example:
| Rule name and colour | Meaning |
|---|---|
 |
The rule was not changed. |
 |
The rule was added in third position in the execution order. |
 |
The rule mode has changed from decisive to informative. |
 |
The rule has moved in the execution order from 2nd position to 1st position. |
 |
The rule mode has changed from decisive to informative with an execution order of 2. |
 |
The rule was removed. |
 |
The rule was not moved but its settings were changed. |
Modification on a value
Colour codes are also applied on value modification:
| Value | Meaning |
|---|---|
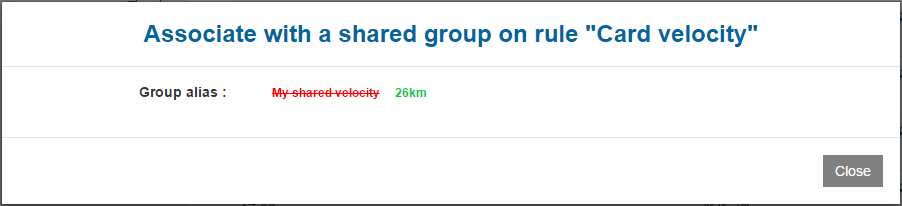
| Value in green. | New value. |
| Value in red and strikethrough text. | Former value. |
| Value in black. | Value unchanged. |
In the case of a modification, the former value in red strikethrough text is followed by the new value in green.
Group/list association
After clicking on the icon, a popup displays, showing the changes between the new group/list to which the eShop belongs and the former. So you will see the former in red strikethrough text and the new group in green :