Introduction
Mercanet is a secure multi-channel e-commerce payment solution that complies with the PCI DSS standard. It allows you to accept and manage payment transactions by taking into account business rules related to your activity (payment on despatch, deferred payment, recurring payment, payment in instalments, etc.).
The purpose of this document is to help you manage user accounts and transactions, and to understand the operations available on Mercanet Back Office. Indeed, the operations that each user can perform on transactions differ according to the access rights they have.
Who does this document target?
This document is intended for merchants wishing to discover and use the management features offered by Mercanet Back Office.
To get an overview of the Mercanet solution, we advise you to consult the following documents:
- Functional presentation
- Functionality set-up guide
- Glossary.
Managing transactions
Creating a payment
Creating a one-time payment
Payment by credit card is the most widely used means of payment in the world of e-commerce, with a predominance of international Visa & Mastercard networks that coexist with domestic networks (CB for France, Bancontact for Belgium, etc.).
Some cards may belong to several networks (for example cards co-badged with CB and VISA). A European regulation (Multilateral Interchange Fee, or MIF) gives you the possibility to make a default brand choice, but the end customer can change this choice when he is on the payment page. This regulation concerning the selection of the brand has an impact on the payment pages which must present this choice when the card entered for payment is concerned by this regulation (co-branded card) .
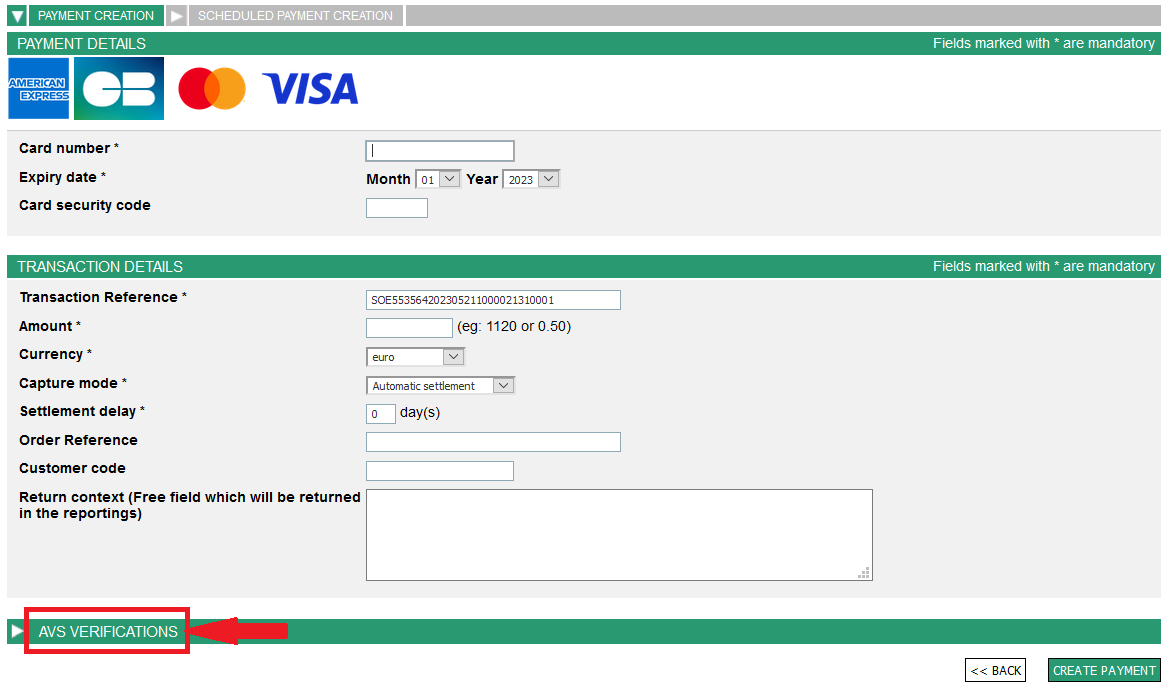
To create a payment, click on the tab.
The following page will display.
Click on the tab.
The following page will display.
Click on the tab.
 tab.
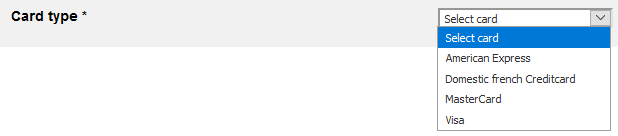
tab.Select the card type in the dropdown menu.
Then click on .
The following page will display.
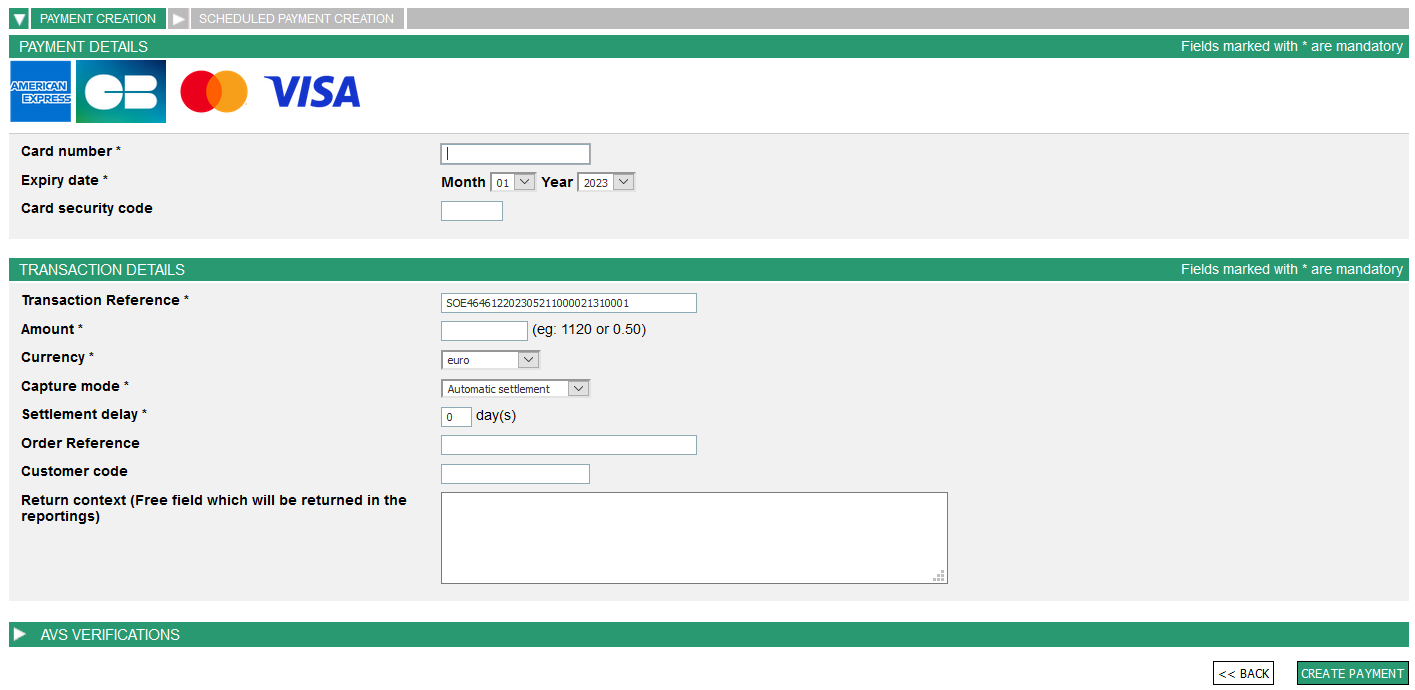
Fill in the following fields:
- card number

If your contract is subject to the MIF regulation (EU OJ 2015/751 L123 dated 05/19/2015), an automatic detection of the card's network(s) is performed. If the card is co-badged, several network logos are displayed on the right of the card number:

By default, one of the networks through which the payment will be made is selected:
If you would like to select another network, click on the link below:

The following page appears and shows your choice:

- card expiry date

- security code (CVV -> three digits on the back of the card);

- transaction reference. The reference is saved by default but can be modified (35 alphanumerical characters by default)
- transaction amount
- transaction currency


- capture mode

- capture delay

- the order reference, customer code and additional information are optional values

Click on to validate the transaction.
If payment is accepted, the following page will display:
Below is an example of a refusal page displayed for a refused payment:
Click on to create a new transaction.
Creating a payment in instalments
You have the option of splitting a transaction into several parts, which will be sent to the bank at specified intervals.
Thus, a payment transaction in n times creates n transactions, each with a distinct identifier. Each transaction is independent of the others and includes a systematic authorisation request. In case of agreement, the transaction in question is sent for capture. In case of refusal, the transaction is not submitted again.
Click on the  tab.
tab.
Then select the card type in the dropdown menu.
Click on  .
.
The following page will display:
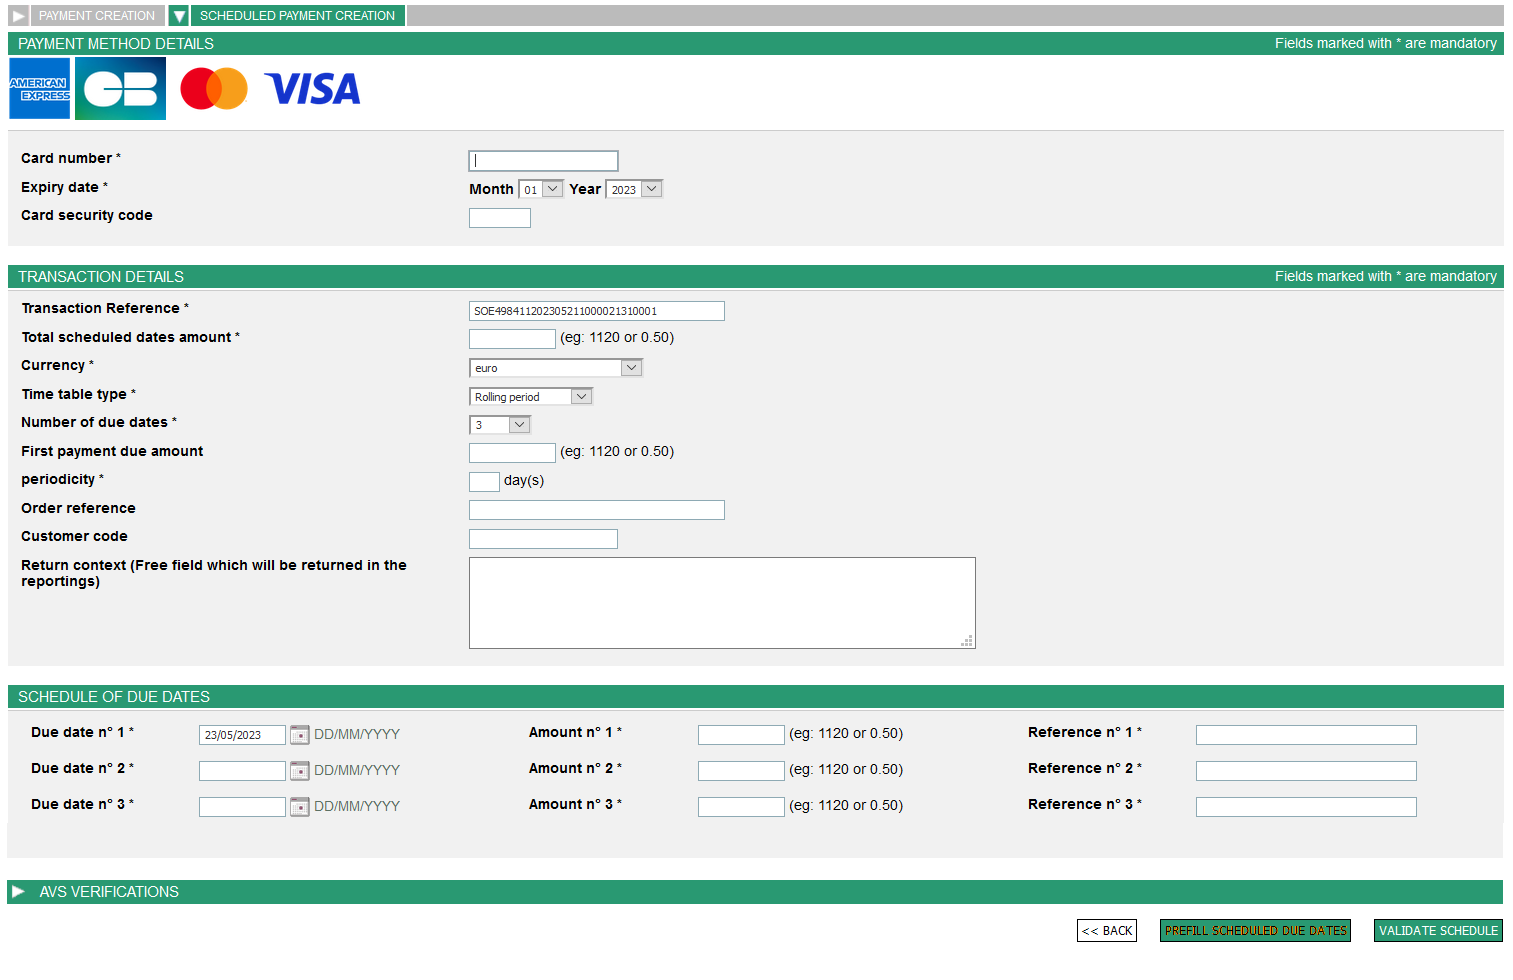
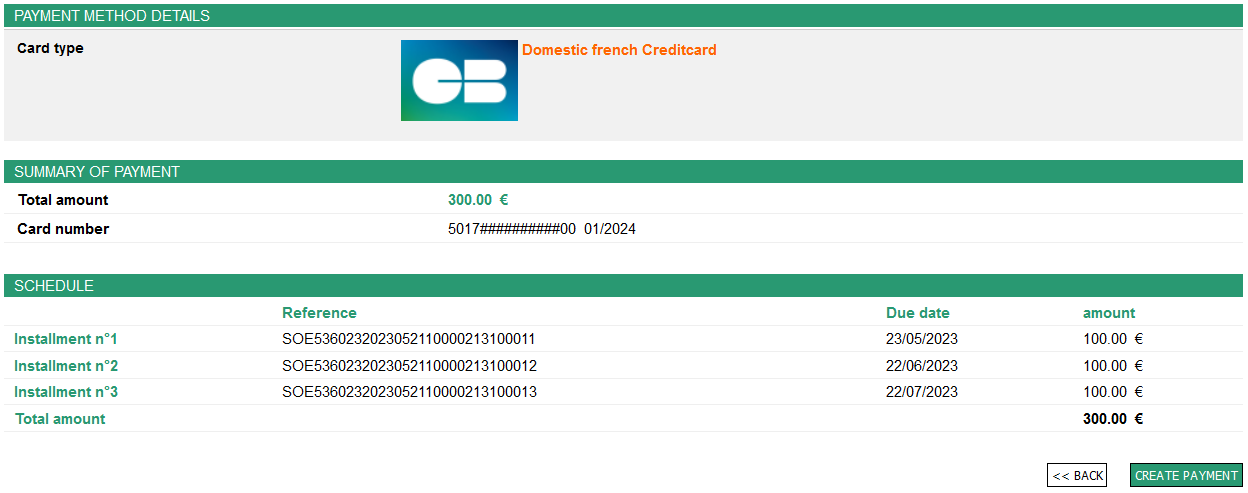
In the "means of payment details" and "transaction details" sections, fill in the following fields:
- card number
If your contract is subject to the MIF regulation (EU OJ 2015/751 L123 dated 05/19/2015), an automatic detection of the card's network(s) is performed. If the card is co-badged, several network logos are displayed on the right of the card number:
By default, one of the networks through which the payment will be made is selected:

If you would like to select another network, click on the link below:
The following page appears and shows your choice:
- card expiry date
- security code (CVV -> three digits on the back of the card);
- transaction reference. The reference is saved by default but can be modified (35 alphanumerical characters by default). This reference can be used as a basis for generating the multiple transactions that will be generated.
- total scheduled dates amount

- transaction currency
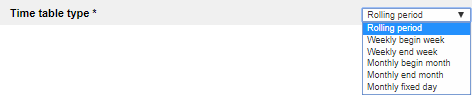
- time table type
- number of instalments for the payment (for example 4 for a payment in 4 instalments)

- frequency in days

- first payment due amount

- the order reference, the customer code and additional information are optional values
In the "Payment schedule" section...

...fill in the following fields:
- enter the payment instalments as well as the amounts associated with each instalment

The payment schedule can also be auto-completed by clicking on  . The schedule is then automatically auto-completed
according to the total amount, frequency, type of schedule and first due
date amount entered in the "transaction details" section.
. The schedule is then automatically auto-completed
according to the total amount, frequency, type of schedule and first due
date amount entered in the "transaction details" section.

Once the information has been correctly completed, click on  to validate the payment date.
The following page will display:
Having checked the information, click on  to validate the transaction.
The following page will display:

To search for transactions with future dates, use the Advanced search" tab and apply the "Authorisation requests being processed" option in the Transaction status" menu. The tool will display a list of all future transactions.
AVS checks
If you would like to send the information necessary to the address verification check, click on the "AVS controls" banner:
AVS is an anti-fraud feature that allows you to request the cardholder's address, send it within the authorization request and let the card issuer compare this address with the one they know.
The following form will display:
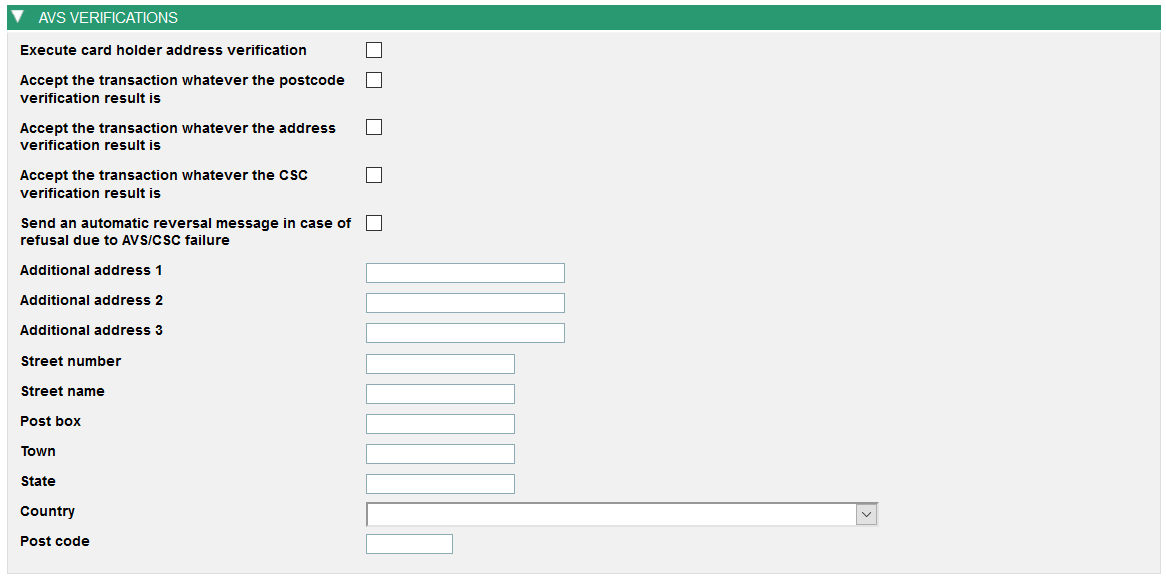
Fill in the following fields:
- check the following box if you would like the cardholder's address check to be done:

- check the following boxes if you would like the transaction to be accepted regardless of the result of the check on the postal code and/or address:

- check the following box if you would like an automatic reversal message to be sent in case of refusal due to an AVS/CSC failure:

- fill in the various information about the address and postal code:
Searching for a transaction
Click on the  tab.
tab.
The following page will display:
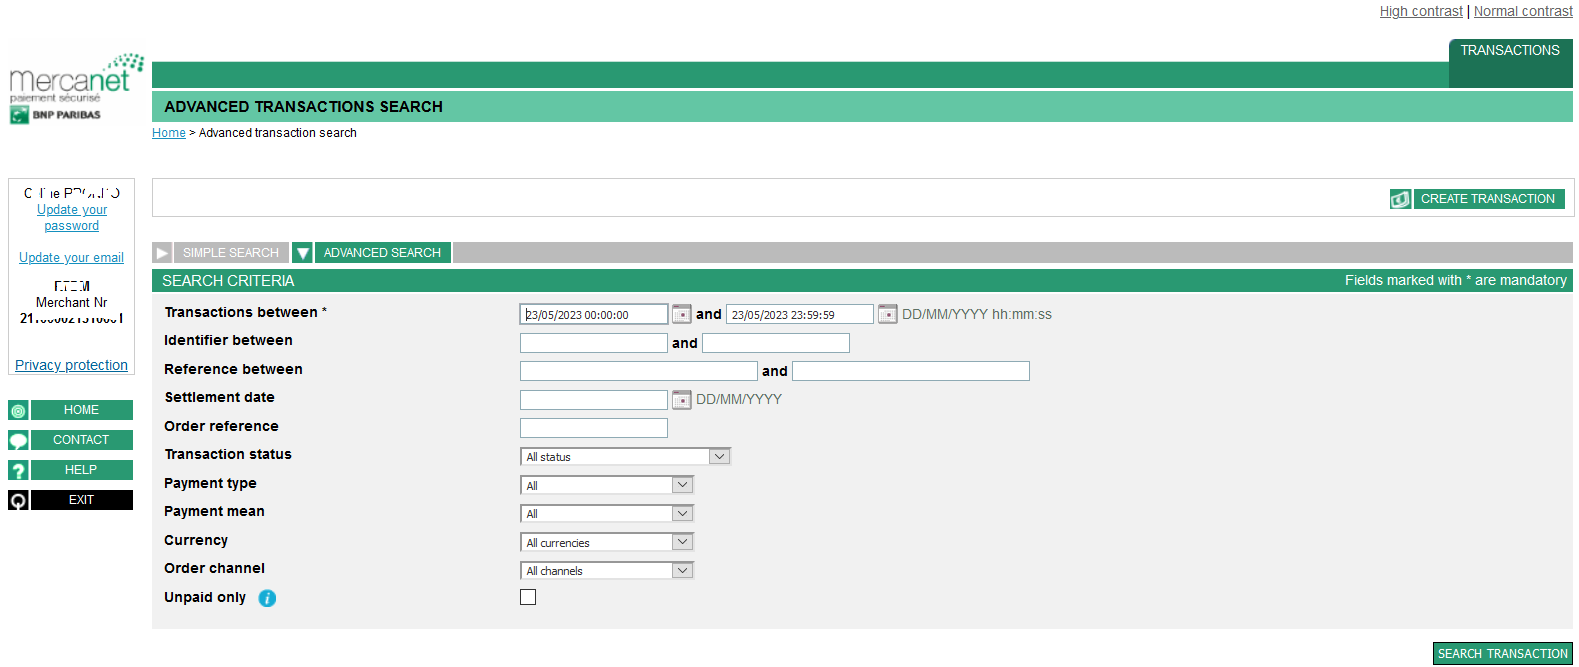
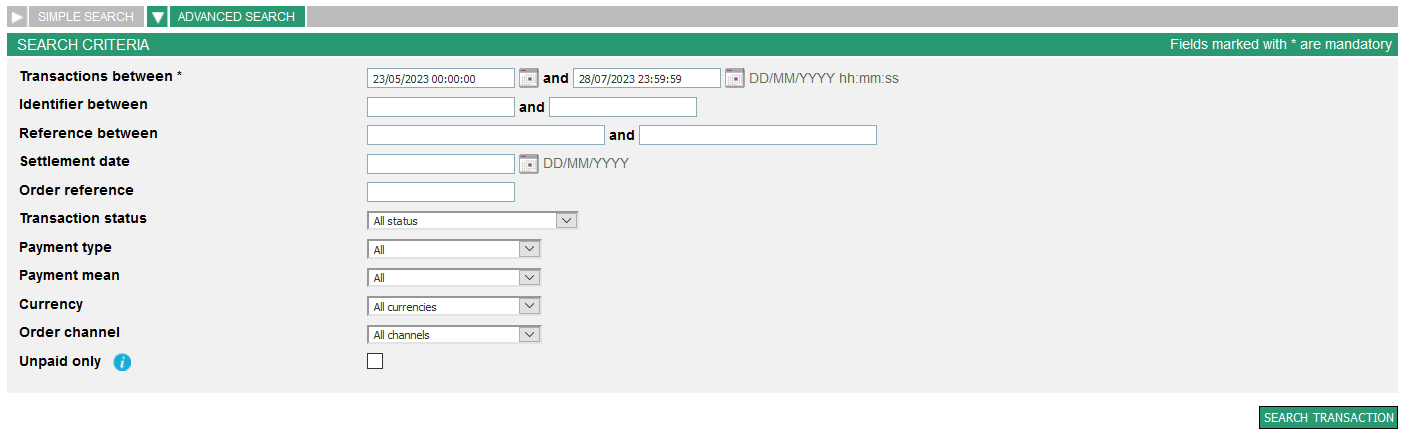
A search can be based on the following criteria:
- transaction date: enter the start and end dates of the search
With these criteria, the search is completed over a rolling period of up to 60 days that can go back in time up to 18 months before the current date. In this configuration mode, the range corresponds to the start date of the search + 60 days.
For example, if you specify 01/05/2020 as a starting date, the maximum search date will be 30/06/2020.
- transaction reference: enter the references of the transactions searched for
- transfer date: enter the date on which the transaction was captured

- order reference: enter the order ID

- transaction status: select the status from the dropdown list
| Desired action | Value of the "Transaction status" field to be selected during the search |
|---|---|
| Validating a transaction | To be validated (without authorisation) |
| Cancelling a transaction | To be remitted |
| Refunding a transaction | Remitted |
| Duplicating a transaction | To be remitted, to be validated (with authorisation), to be validated (without authorisation), waiting for authorisation, settlement refused, remitted, expired, fraud suspected, refused, refund to be settled, refunded |
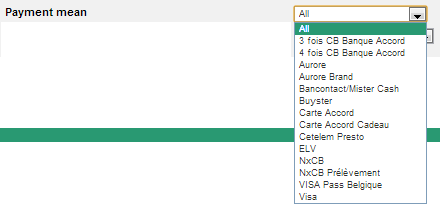
- means of payment: select a means of payment from the dropdown list.
- currency: tick the option to search only for unpaid transactions.

- unpaid only: tick the option to search only for unpaid transactions.

Once you have entered some search criteria, click on the  button.
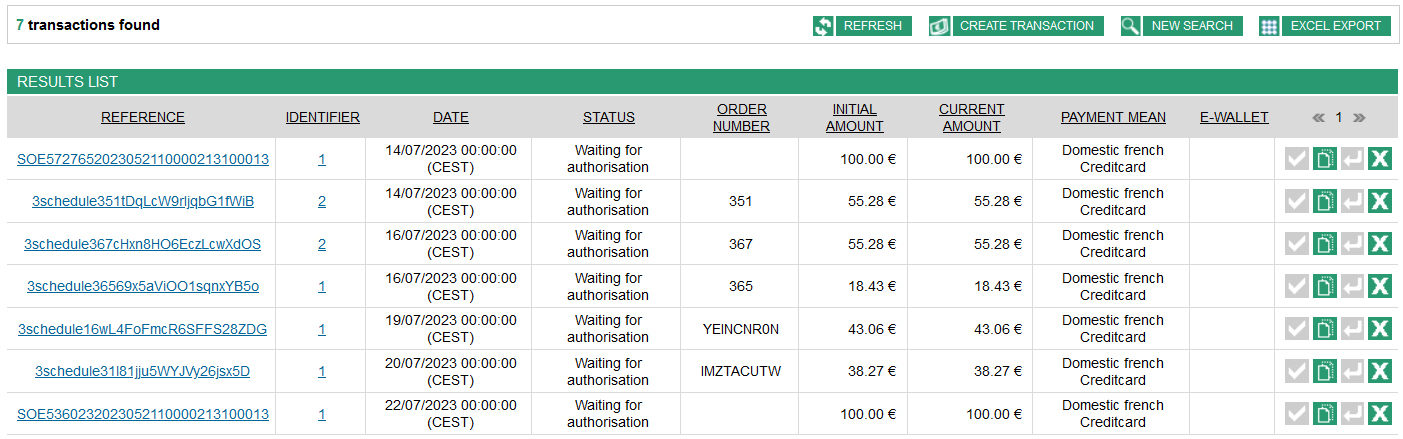
A transaction list will be displayed according to the criteria entered:
- You can sort the results by clicking on the column headers.

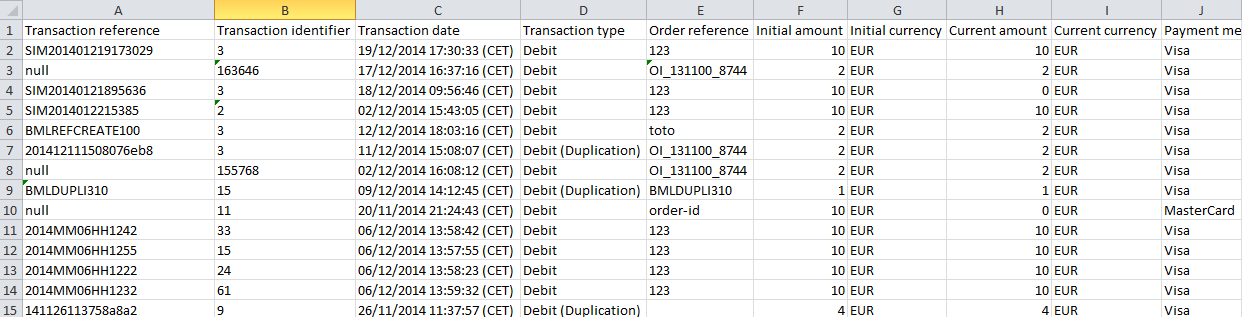
- You can also view the list of transactions in an Excel spreadsheet.
To do this, click on
 .
.
The following spreadsheet will display:
- You can click on a transaction reference to display the transaction details:
Several related information is available in the detail of a transaction:
- Click on
 to view the operation history

Then click on  to return to the original list, or on
  to return to the original transaction.
- Click on
 to view the detailed result of the fraud risk
management process
to view the detailed result of the fraud risk
management process
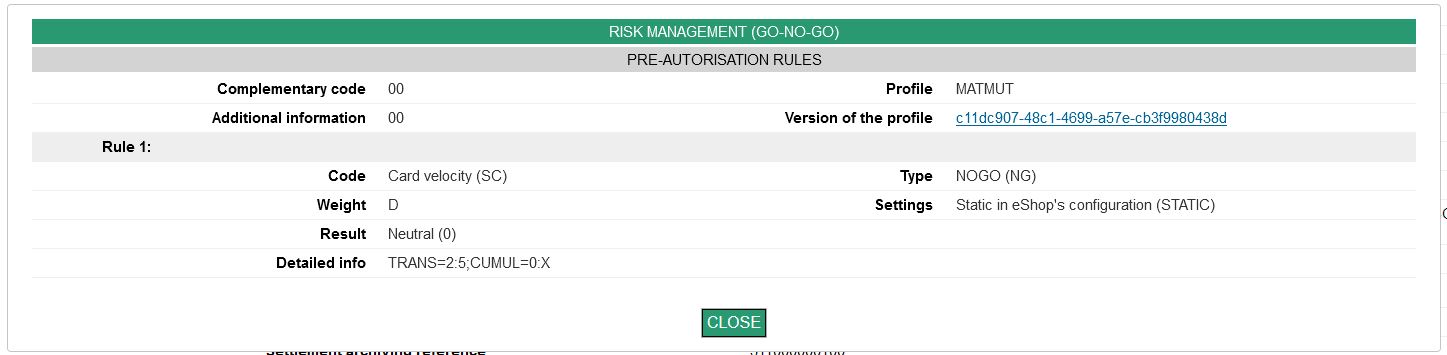
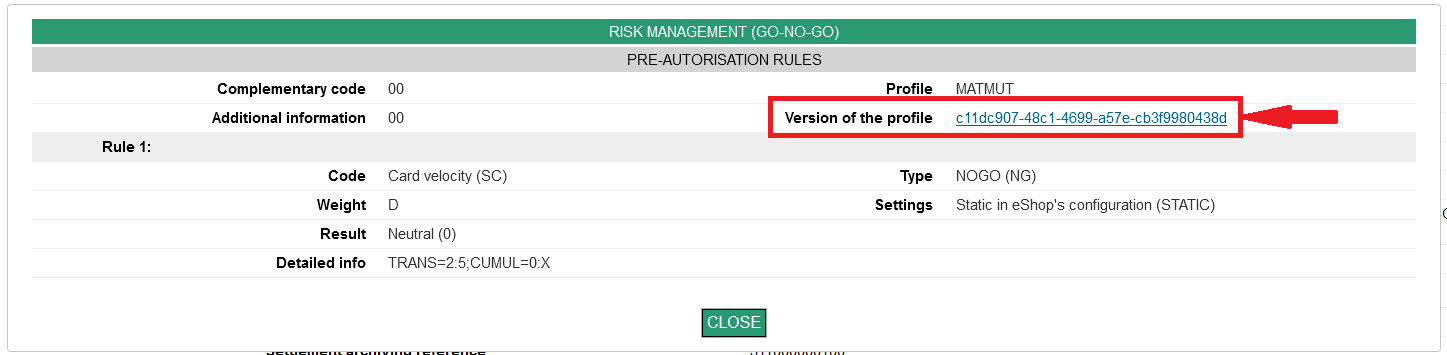
You can also view the fraud profile version that was used to perform the checks by clicking on the following link:
The following pop-up window will display:
In order to interpret the result of the fraud risk management process, please read the following documents:
- Fraud risk management - Go-No-Go for the Go-No-Go mode.
- Fraud risk management - Business Score for the Business Score mode.
Managing and acting on a transaction
Perform a search to find the transaction you want to act on (see the Searching for a transaction section).
Various actions can be performed on a given webshop transaction, depending on the contract and the status of the transaction.
Click on the appropriate button depending on whether you are on the results list or transaction details view.
| Action | Explanations | Associated button in the list of results (vert = operation is available; grey = operation is unavailable) |
Associated buton in the transaction details (not shown if action is unavailable) |
|---|---|---|---|
| Validate | Allows you to trigger the transmission of the transaction to the bank and allows you to defer a payment. |   |
 |
| Cancel | Allows you to change the amount to be sent to the bank. |   |
 |
| Refund | Allows to credit the customer's account that was wrongly debited. |   |
 |
| Perform a unitary duplication | Allows you to create a new transaction from an old one. |   |
 |
| Schedule duplications | Allows you to create a new transaction from an old one, by scheduling payment due dates. |   |
 |
Validating a transaction
The validation function makes it possible to trigger the transaction capture. It also enables you to defer a payment so the customer's account is debited only when the purchased goods have been dispatched.
If the chosen method for sending the bank transaction is not automatic, you have to validate every transaction manually. If you do not validate a given transaction before its chosen capture time (as selected) ends, this transaction will expire. It will then be impossible for you to send it to the bank.
You can validate all or part of the transaction amount. The amount validated will be captured on the day of its validation. It is of course impossible to validate an amount that exceeds the initial amount of the transaction.
Having clicked on the validation button of a transaction in the list
of results or on the button in the seleted transaction
details, the following page will display:
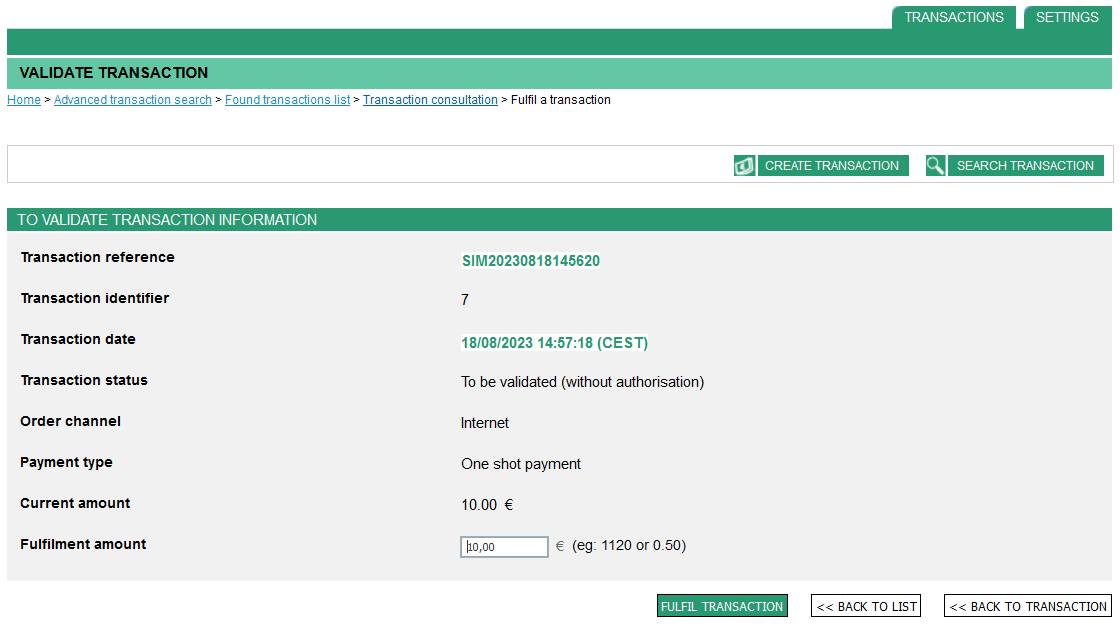
Enter the amount to be validated in the following field:

Click on  .
.
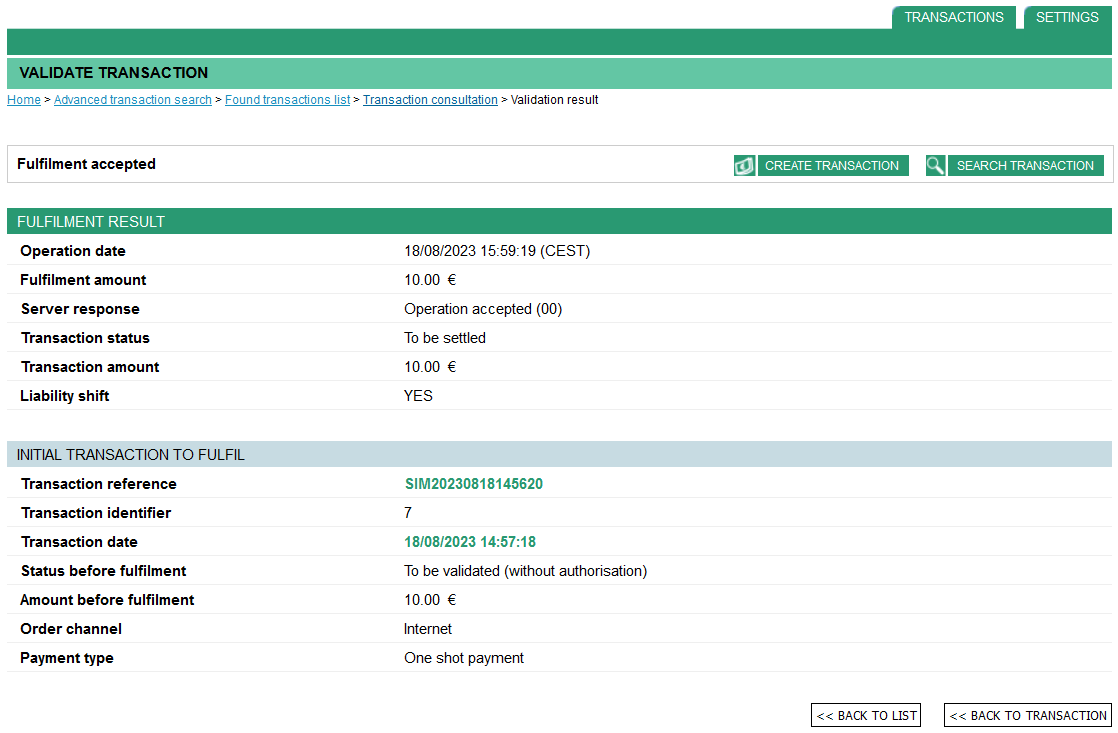
The following page below will then display if the validation is successful:
If the validation has failed, the following page will display:

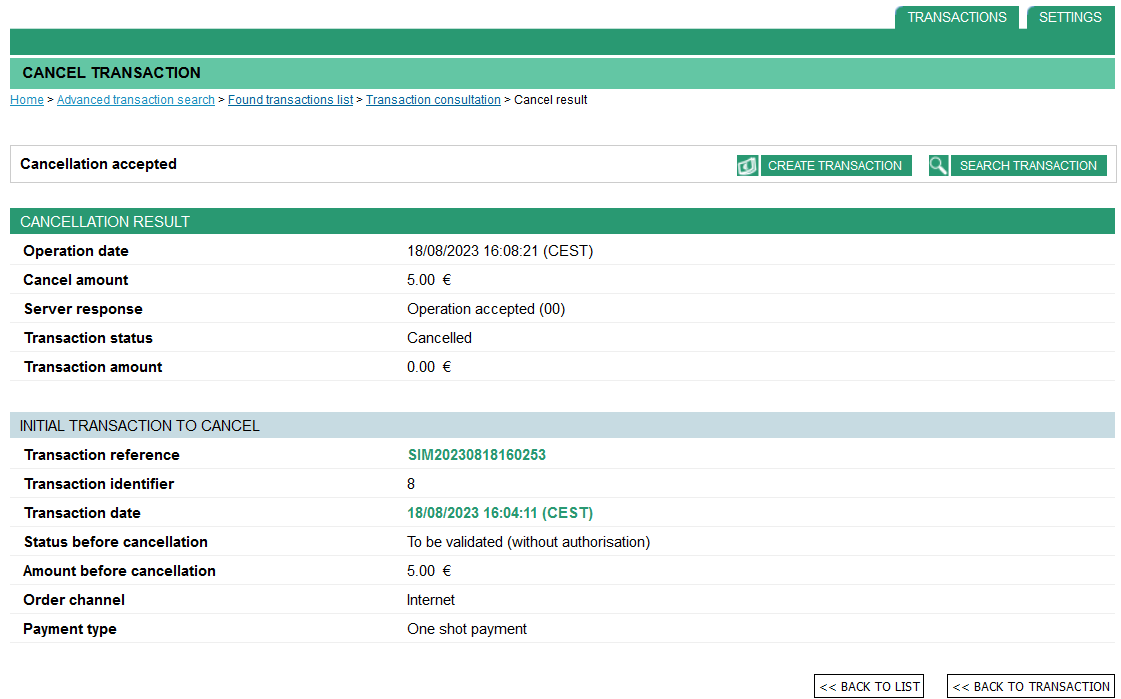
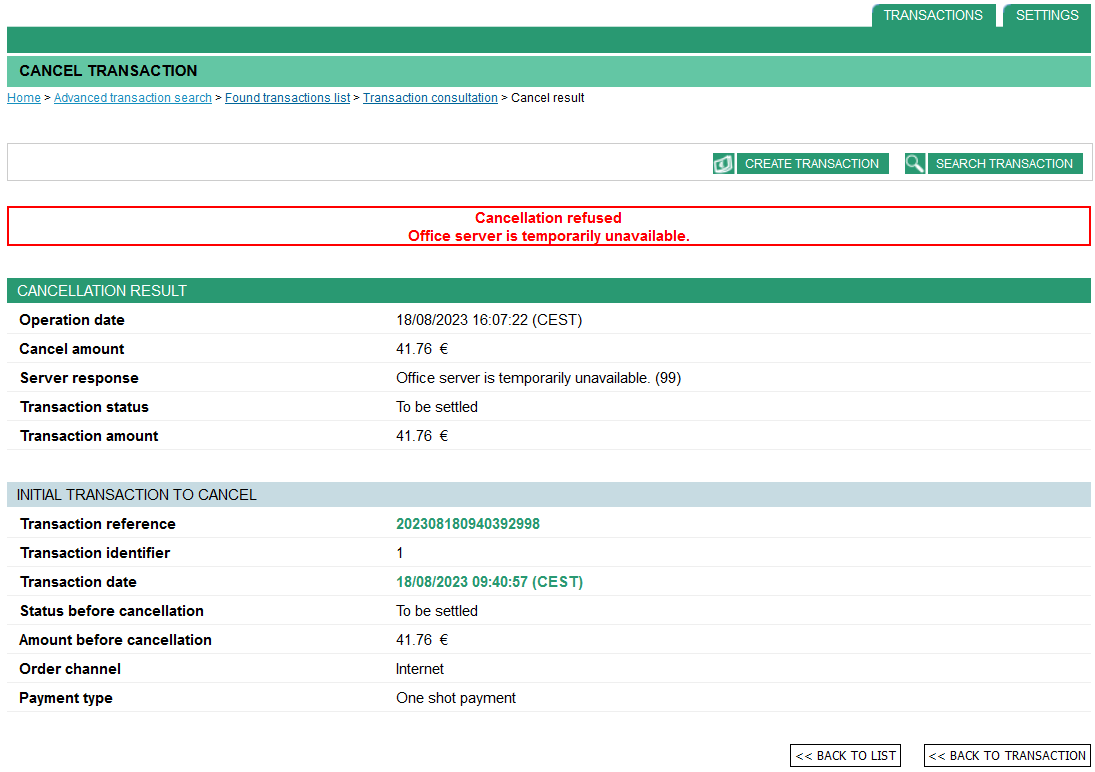
Cancelling a transaction
This function makes it possible to change the amount to capture. For you, it is useful for inventory management purposes. When a customer has cancelled several products that are part of a single transaction, you can cancel the latter partially. In this case, the amount cancelled will be that of the unavailable product, and the customer will only be charged for the products that were actually delivered.
Transactions can only be cancelled before they are captured. A transaction cannot be cancelled if it has already been captured. However, refunding the customer fully or partially is still possible.
By default, deferred capture is inactive (0 days), which means that the capture is carried out on the same day as the transaction. To defer the date on which transactions are captured, you have to make sure that this setting has been configured correctly.
When a cancellation is requested, the Mercanet server checks two parameters:
- The amount. An amount that is higher than that of the original transaction cannot be cancelled.
- The transaction cancellation period, which is set at the time of payment. Beyond this period, the transaction is captured and can no longer be cancelled.
A transaction can be cancelled several times provided the transaction capture deadline is not overdue and the transaction balance is not null.
In the case of a partial cancellation, the balance of the transaction is automatically captured after the capture time is up.
Having clicked on the cancellation button of a transation in the
listof results or on the button in the selected transaction
details, the following page will display:
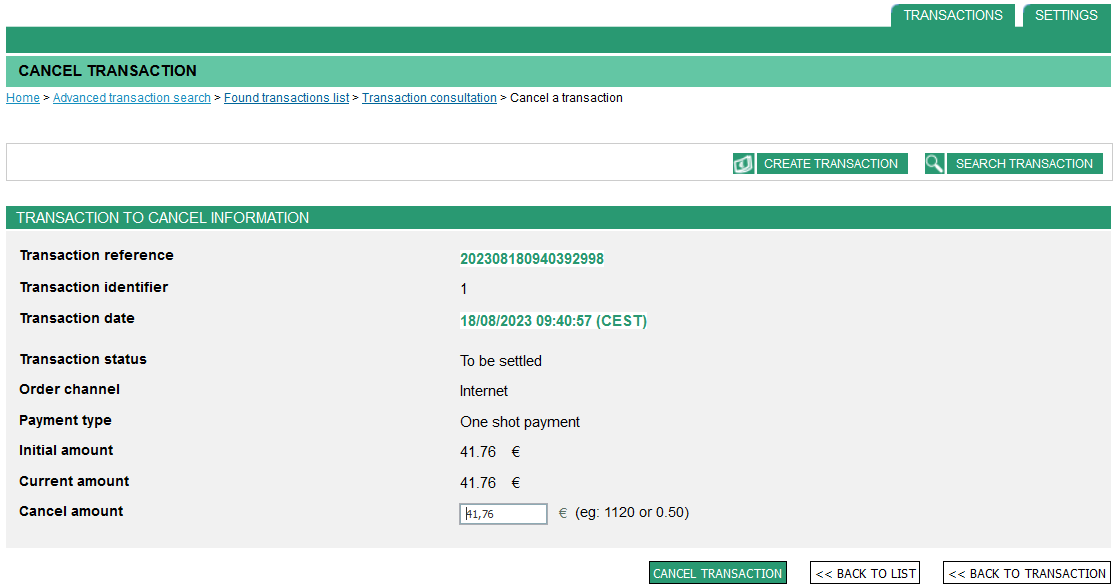
Enter the amount to be cancelled:

Click on  .
.
The following page will then display if the cancellation is successful:
If the cancellation has failed (the amount is higher than the amount of the initial transaction), the following page will display:
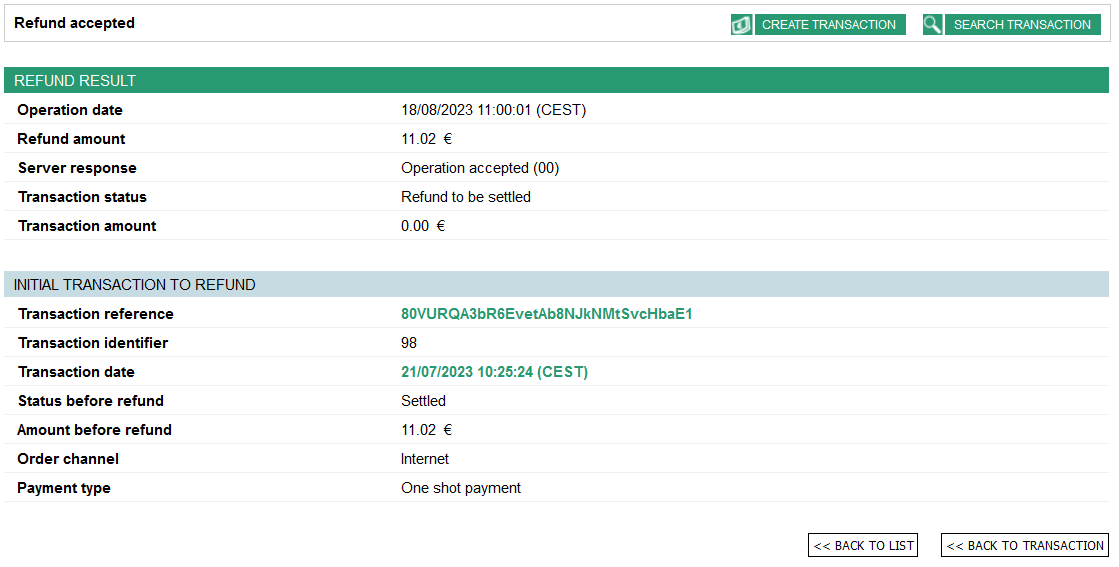
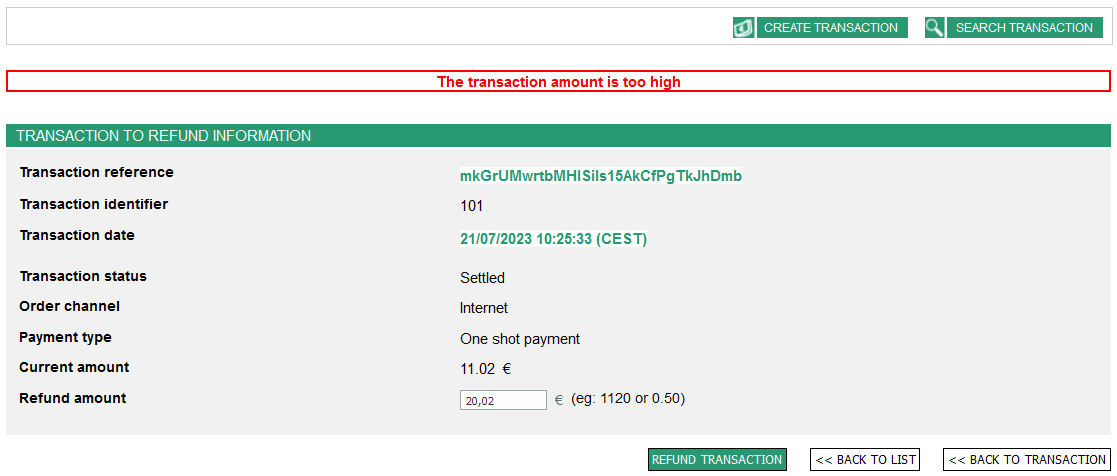
Refunding a transaction
A refund makes it possible to credit the account of a customer that was unduly charged (if the product was not delivered, is unavailable, damaged, returned, etc.).
The customer's account will be credited with the refunded amount, and your account will be debited with the same amount. The refund is captured on the same day. The refund is captured on the same day it is entered in Mercanet Back Office.
You can refund a customer for a period of fifteen months following the order. You can make an unlimited number of partial refunds, provided these fifteen months are not exceeded and the balance is not null.
After you have clicked on the refund button of a transaction in the list of
results or on the  button in the selected transaction
details, the following page will display:
button in the selected transaction
details, the following page will display:
Enter the amount to be refunded:

Click on .
If the refund is successful, the following page will display:
If the refund has failed (the amount is higher than that of the initial transaction), the following page will display:
Authorization Required Prior to refund:
To ensure transparency and traceability of transactions, all credit operations are automatically subjected to an authorization request. In the context of a refund operation, two columns display the acquirer response codes and the associated identifier related to this authorization request.
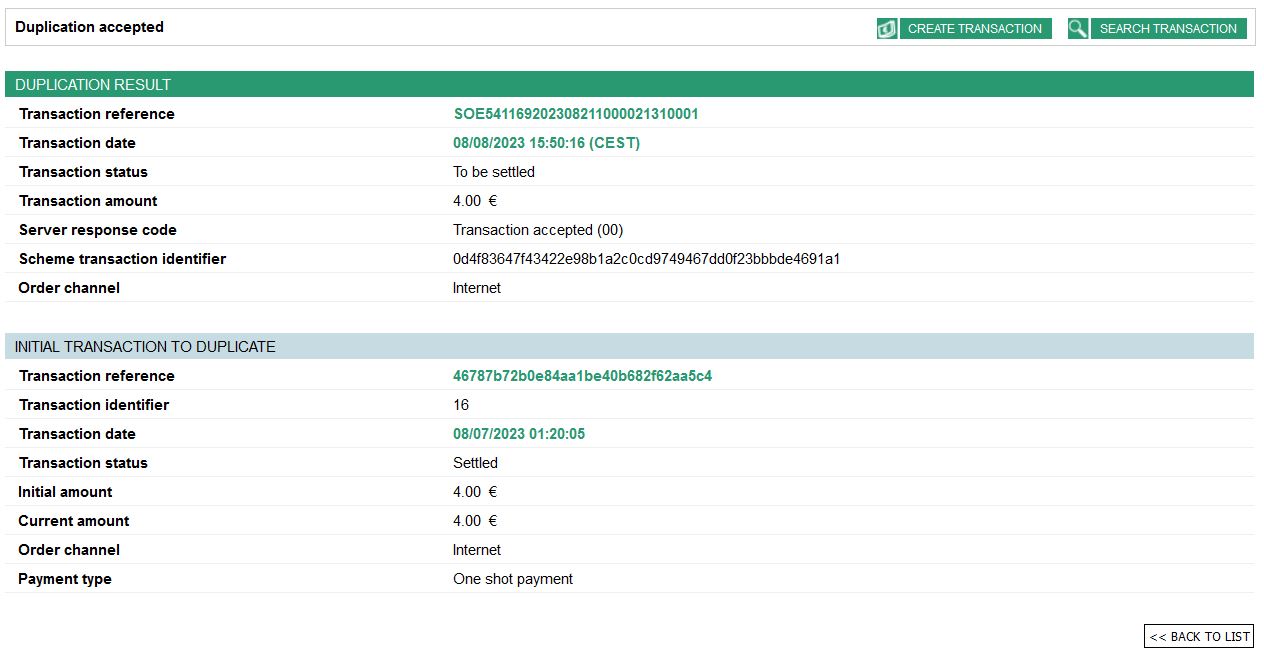
Duplicating a transaction
You can create a new transaction using an old transaction.
Duplicating a transaction is possible up to 18 months after its creation date and provided the expiry date for the means of payment has not been exceeded. The transaction created during the duplication is a new transaction. All of the characteristics of this transaction can be changed, with the exception of the card information, which you does not need to store in your IT system. A transaction created by duplication can in turn be duplicated.
Duplicating a transaction requires a new authorisation request, using the payment information (card number, account number etc.) corresponding to the original transaction. The future of a duplicated transaction does not under any circumstances depend on the result of the original transaction: if the initial transaction was refused, it is possible that it is accepted after duplication, and vice-versa.
Any transaction associated with payment in instalments can be duplicated. Payment of this new transaction will be completed in one instalment only.
For example, if a transaction, either by error or omission, was not validated in the capture time you set, it has expired and will therefore not be paid. You may wish to secure this transaction, thererfore you have the option of duplicating an expired transaction. Provided it is authorised, this new transaction will be paid for.
Therefore, this operation can allow you, among other things:
- to replay transactions without having the cardholder's card details
- to catch up on expired transactions, i.e. transactions that would not have been validated in time (in VALIDATION mode)
Creating a single duplication
You may for example perform a search on transactions that have a "to be settled" status.
Having clicked on the duplication button of a transaction in the list
of results or on the button in the selected transaction
details, the following page will display:

Fill in the following fields:
- transaction reference. The reference is saved by default but can be modified (35 alphanumerical characters by default)
- capture mode
- transaction amount
It must be less than or equal to the amount displayed.
- transaction currency
- settlement delay
- the order reference, customer code and additional information are optional values
Click on  .
.
The following page will display in case the operation has been accepted:
Scheduling duplications
You may for example perform a search on transactions that have a "to be settled" status.
Having clicked on the duplication sheduling button of a transaction
in the list of results or on the button in the selected transaction
details, the following page will display:
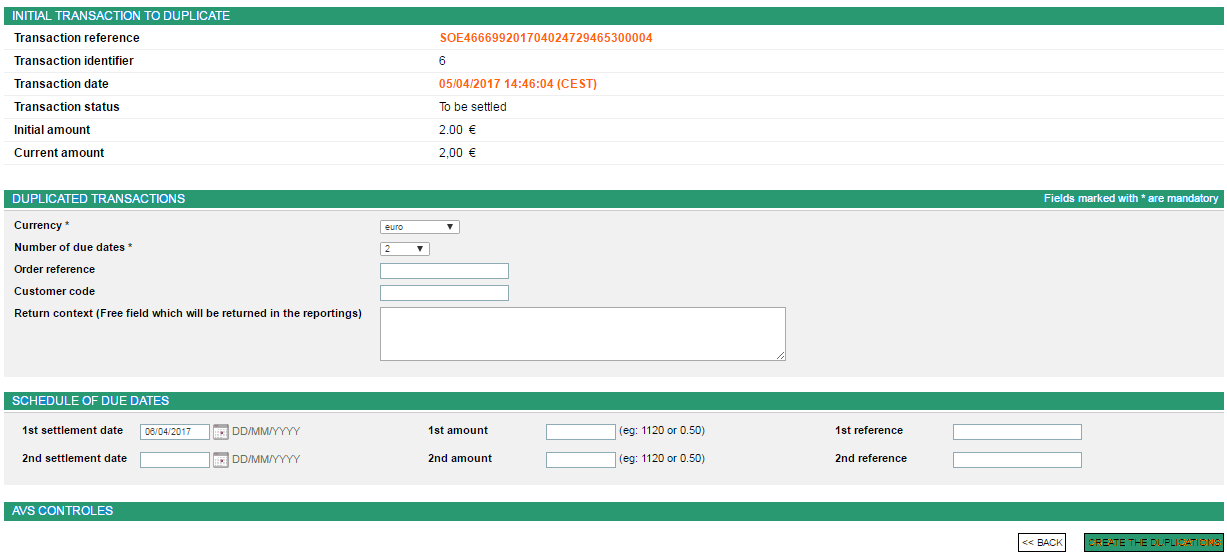
Fill in the following fields:
- transaction currency
- number of instalments for the payment: (for example 4 for a payment in 4 instalments)
- the order reference, the customer code and additional information are optional values
In the "Payment schedule" section...
...fill in the following fiels:
- enter the payment instalments as well as the amounts associated with each instalment
Click on  .
.
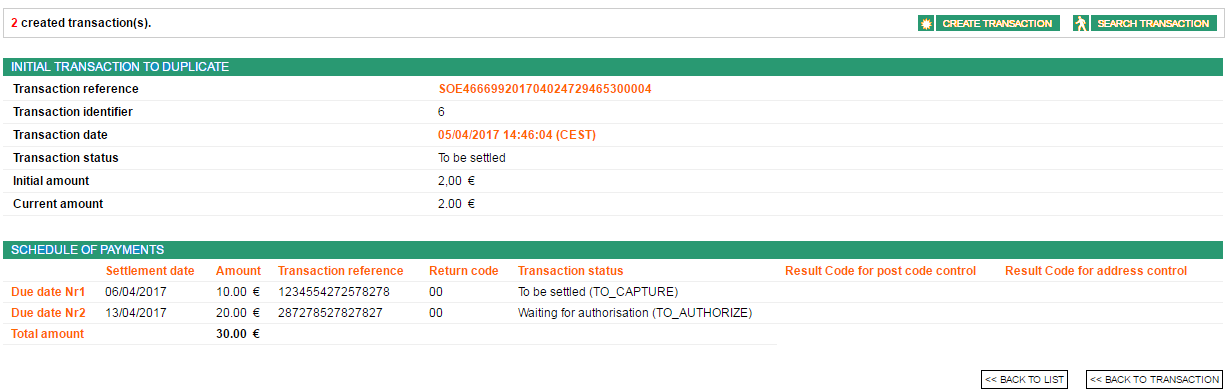
The following page will display in case of a accepted operation:
Managing the wallet
Deleting a means of payment
Click on the  tab.
tab.
The following page will display:

Fill in the following fields:
- complete wallet ID

Once you have set the parameter, click on the  button. The folloing page will display:

Click on the button to delete a means of payment. The following
page will display:

Click on  .
.
The following page will display if the means of payment has been deleted successfully.

Using the creditor space
The creditor space is for the management of mandates and offers the following features:
- Search and consultation of mandates by list.
- Detailed consultation of a mandate.
- Download of a mandate in PDF format.
- Display of the direct debit list associated with a mandate.
- Management of the mandate life cycle (cancellation, suspension, reactivation, etc.).
- Changing mandates.
- Creation of a mandate for electronic or handwritten signature (including a mandate printing feature).
- Signature of a mandate pending a signature to change to the "active" status.
- Creation of direct debits (SEPA Direct Debit).
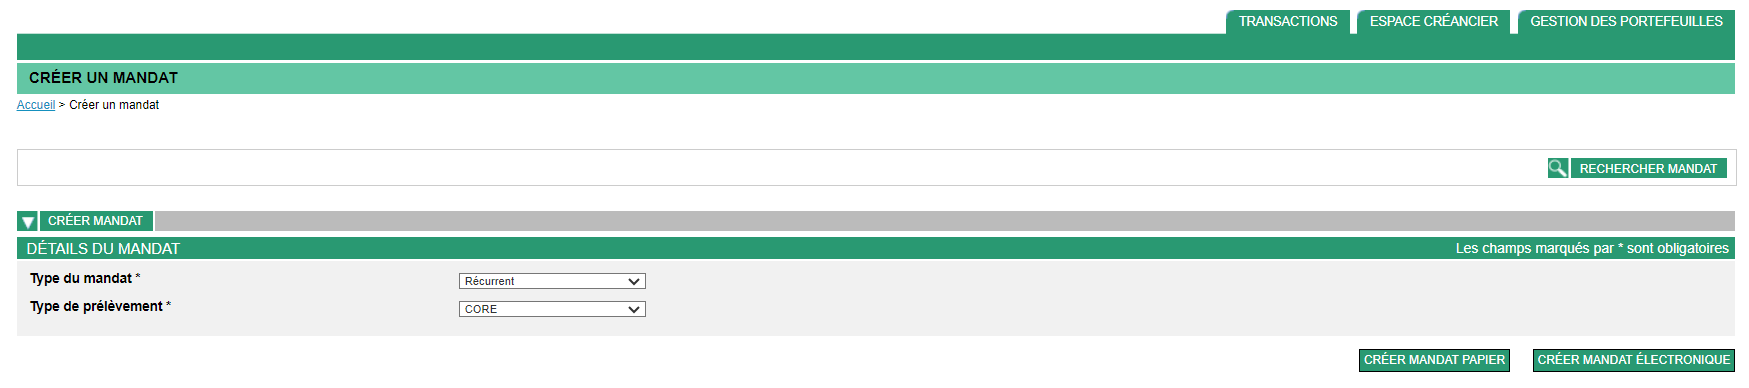
Creating a mandate
Click on the  tab then on the
  button.
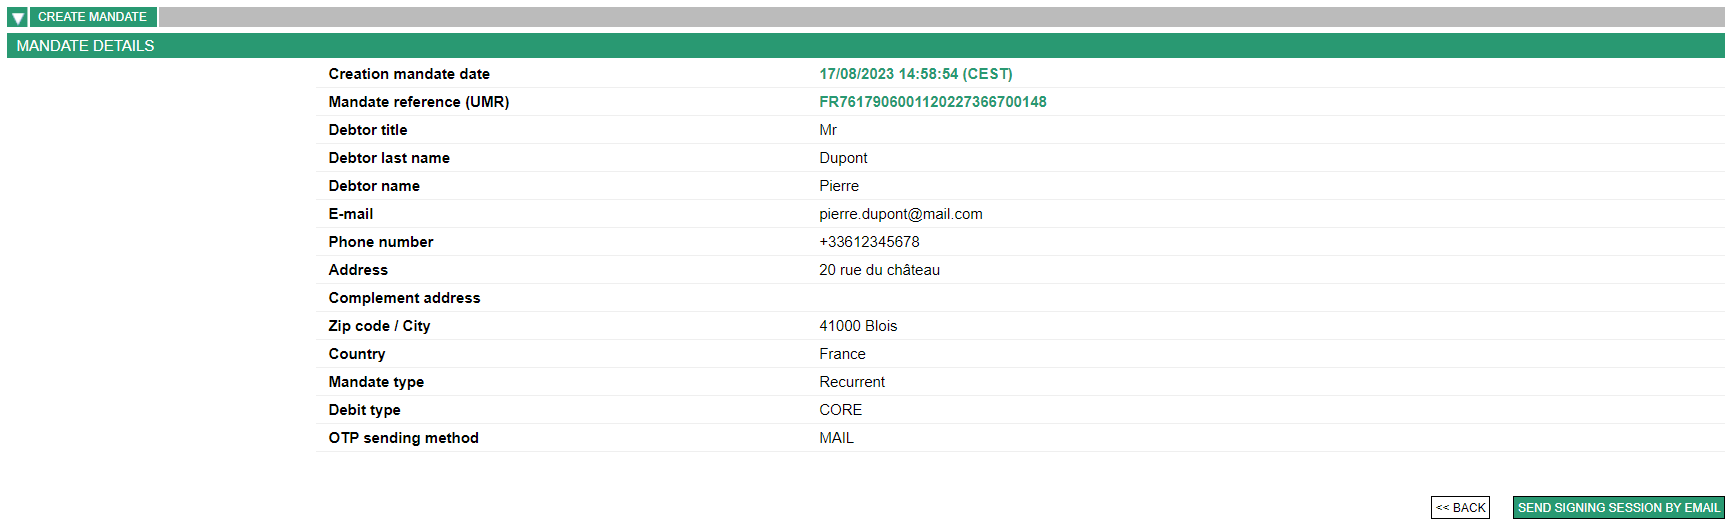
Initialising the mandate
The following page will display:
Select the characteristics of the mandate to be created:
- mandate type: enter the type of mandate (recurring by default)
- The recurring mandate is valid for a series of direct debits. It may be cancelled at any time at any time by the creditor or the debtor and becomes null and void if not used for a period of 36 months.
- The one-time mandate is only valid for a single direct debit, it expires automatically.
- direct debit type: enter the type of direct debit (CORE by
default)
- The SEPA CORE direct debit is available to all types of clients.
- The SEPA B2B (or intercompany) direct debit is reserved exclusively for payments between companies, professionals and associations, and has specific management rules.
Choosing the mandate creation method
The mandate creation method must then be selected:
- The paper mandate is created (with the BIC and the IBAN entered) and activated by the merchant (the debtor is present and can sign the paper mandate on site).
- The electronic mandate is initiated by the merchant (without the BIC and the IBAN entered), then taken and completed by the client via an e-mail link.
Two mandate creation methods are possible:
Creating a paper mandate
Click on the  button to create a paper mandate. The following page
will display:
button to create a paper mandate. The following page
will display:
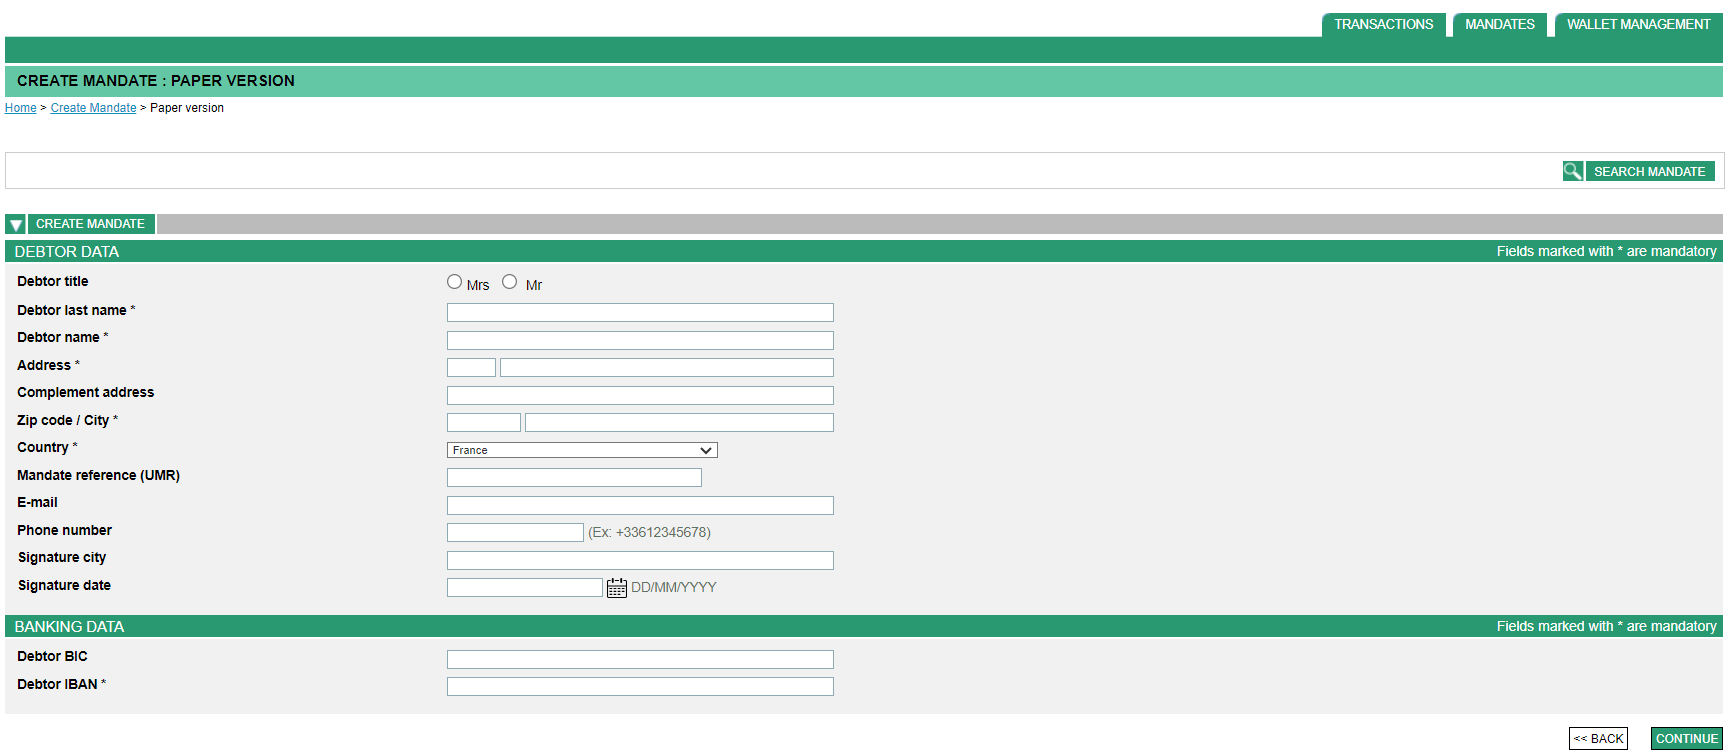
Please enter:
- The title of the debtor
- The last name of the debtor
- The first name of the debtor
- The address of the debtor
- The reference of the mandate:
- Enter the complete reference of the mandate (18 digits, for example 000000000000000079).
- Or enter only the part on the right (e.g. 79), it will be automatically completed with the zeros missing on the left. If no value is entered, a reference will be automatically assigned.
- The debtor BIC code: enter the BIC code of the debtor without spaces. This field is optional and will be automatically recalulated if it is not completed.
- The debtor IBAN code: enter the IBAN code of the debtor without spaces.
Then click on the button.
The following page will display:
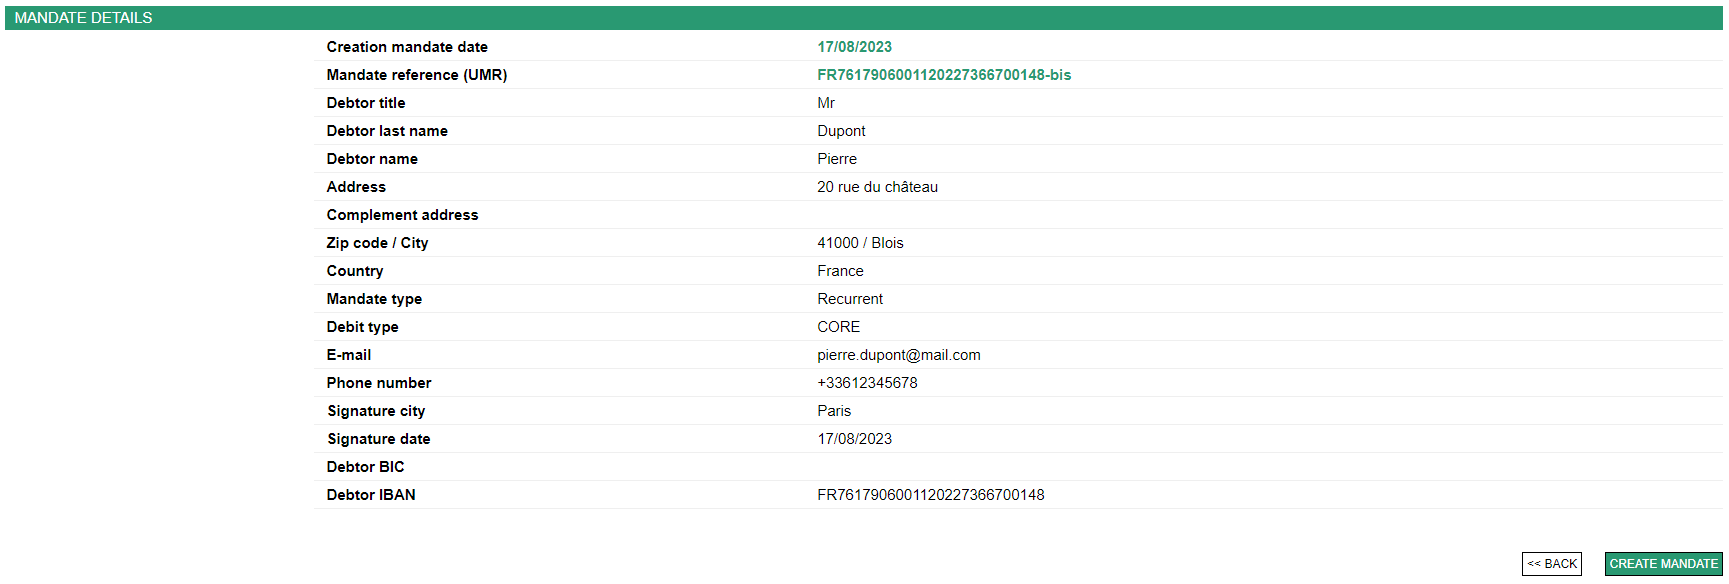
To complete the creation, click on the  button.
The following page will display:
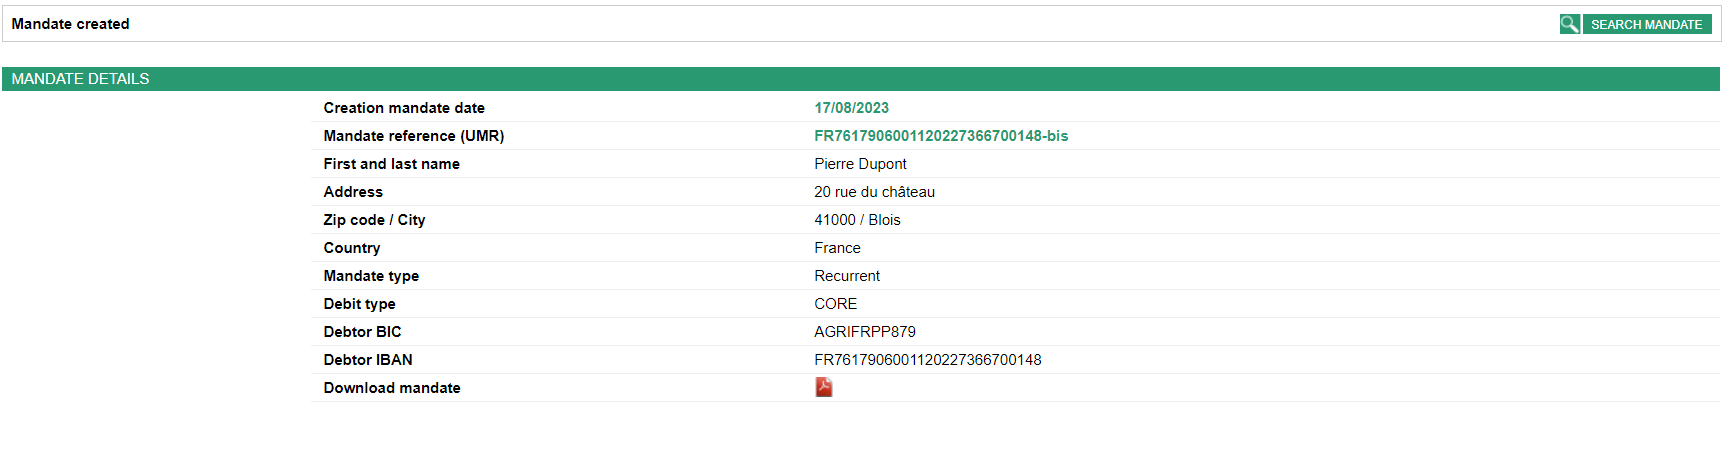
You need to:
- Download and print the mandate.
- Have it signed by the debtor.
- Activate the mandate.
After signing the mandate, click on  . The following page will display:

Please enter:
- The signature date of the mandate.
- The place where the mandate was signed.
To activate the mandate, Click on  . The following page will display:

Creating an electronic mandate
Click on the  button to create an electronic mandate. The following
page will display:
button to create an electronic mandate. The following
page will display:
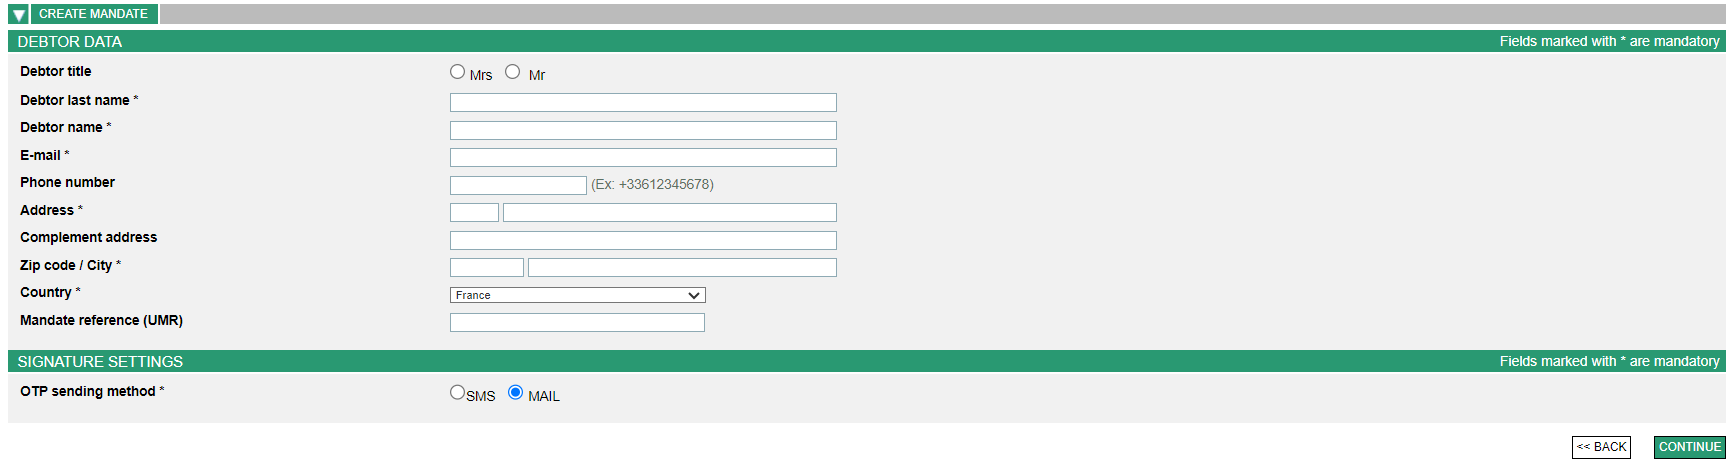
Please enter:
- The title of the debtor.
- The name of the debtor.
- The first name of the debtor.
- The e-mail address of the debtor: please enter the debtor's e-mail address which will be used to send the link to activate the mandate.
- The telephone number of the debtor: enter the telephone number of the debtor if text was selected as the password sending method. If not, this information is optional. The entry format is as follows: +33612345678.
- The address of the debtor.
- The reference of the mandate:
- Enter the complete reference of the mandate (18 digits, for example 000000000000000079).
- Or enter only the part on the right (e.g. 79), it will be automatically completed with the zeros missing on the left. If no value is entered, a reference will be automatically assigned.
- The method for sending the OTP.
- The signature settings allow you to specify by which channel the
client can log in by OTP (One Time Password) in order to validate the
creation of their mandate:
- Text: the debtor will receive an OTP by text message on the phone number entered in the "Debtor details" section.
- E-mail: the debtor will receive an OTP by e-mail at the e-mail address entered in the "Debtor details" section.
This page should then be validated by clicking on .
Text authentication result:

E-mail authentication result:
This page should then be validated by clicking on  .
.
After validating this stage, the debtor receives a link by e-mail in order to complete the mandate creation process. This document collects all the information referring to the creation of their mandate.
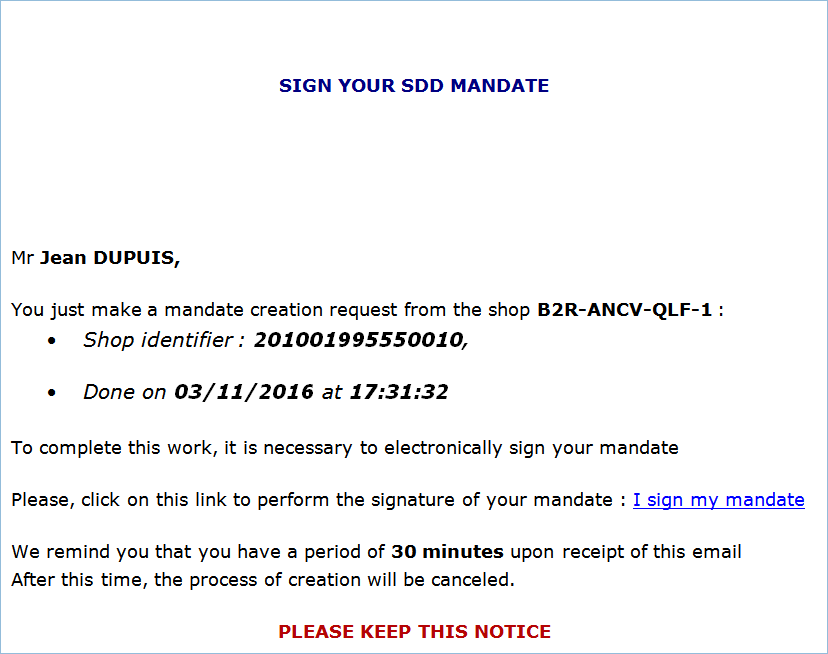
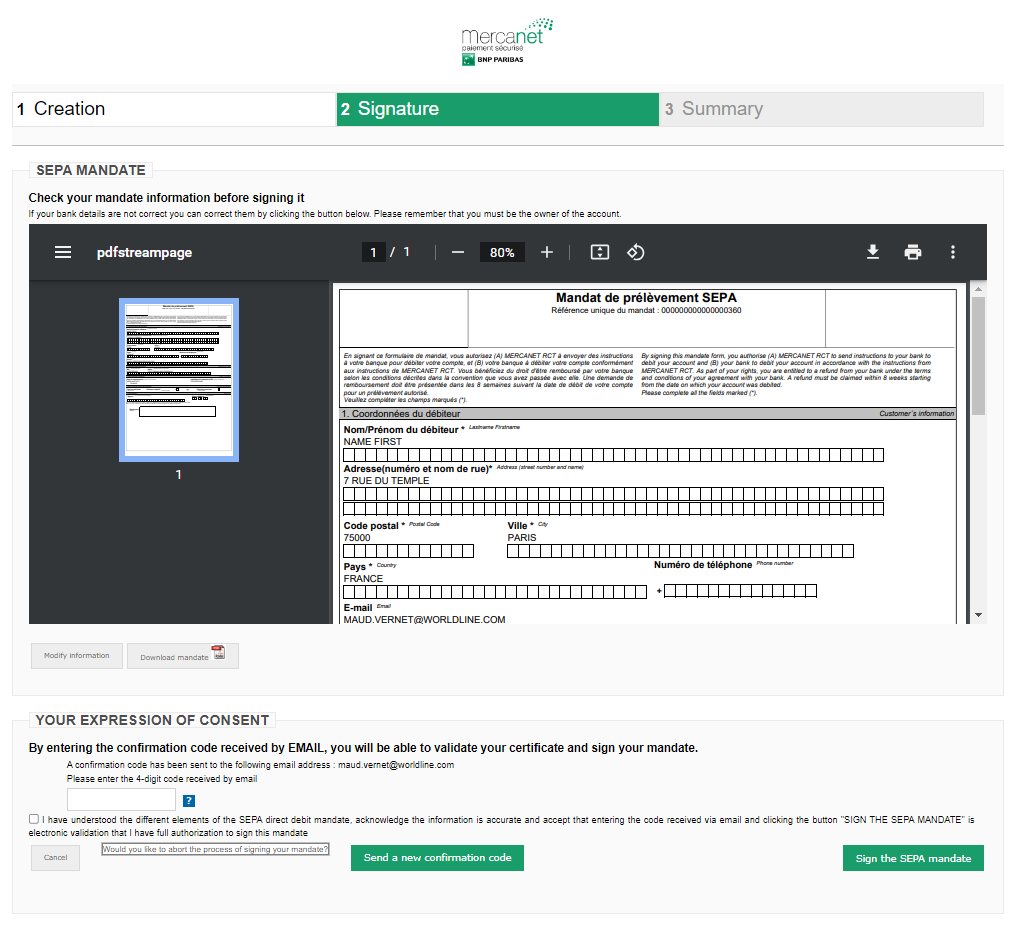
By clicking on "I sign my mandate", the debtor is redirected to the following pages to sign their mandate:
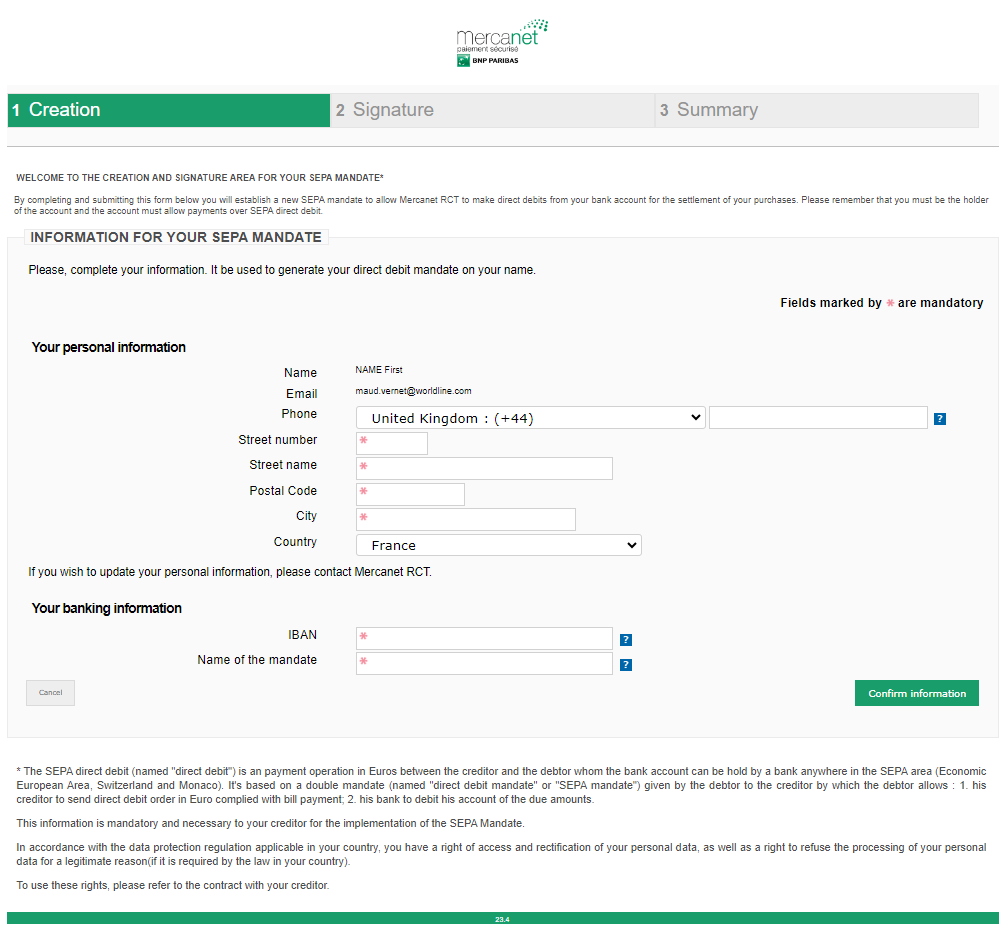
The debtor must then enter their bank details:
- IBAN: bank account ID.
- Mandate name: this name is important as it will allow the debtor to identify this new mandate in their wallet for their next payment to you.
Confirming the entry of this information with the  button takes you to the mandate signature
and generates a code that is sent to the debtor. After receiving the code
by e-mail or text message, the debtor should then enter it in the
appropriate field below.
button takes you to the mandate signature
and generates a code that is sent to the debtor. After receiving the code
by e-mail or text message, the debtor should then enter it in the
appropriate field below.
On this page, the mandate can be downloaded during the signature
process via the  button.
Prior to signing their mandate, the debtor should also enter the code received by e-mail or text message and agree to the acceptance and confidentiality clauses:
By signing their mandate with the  button, the debtor move on to the final
step:
button, the debtor move on to the final
step:
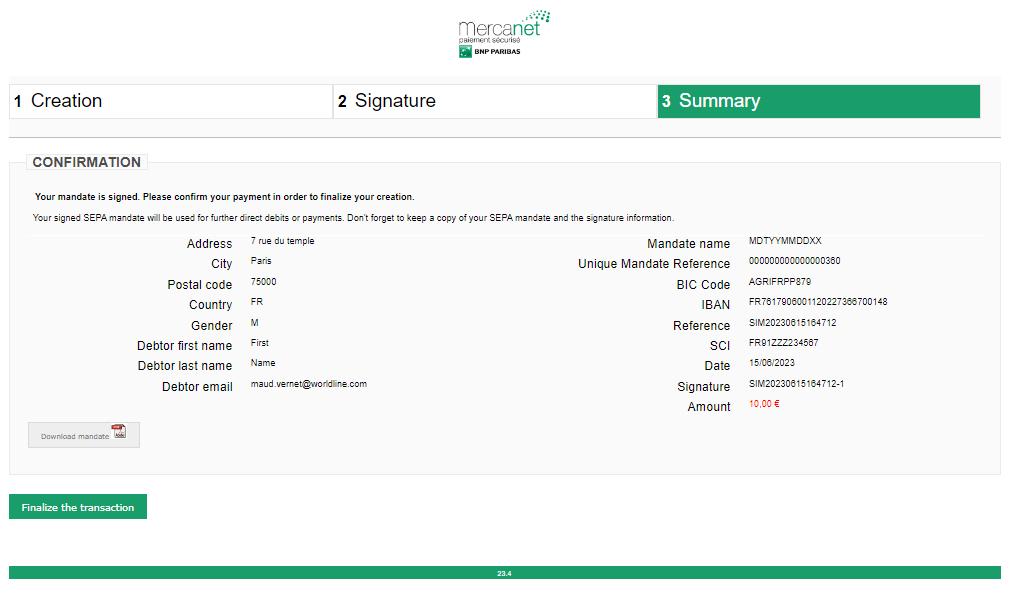
The customer can also download their signed mandate.
Then, the  button completes the mandate creation procedure and
redirects the debtor to your site.
button completes the mandate creation procedure and
redirects the debtor to your site.
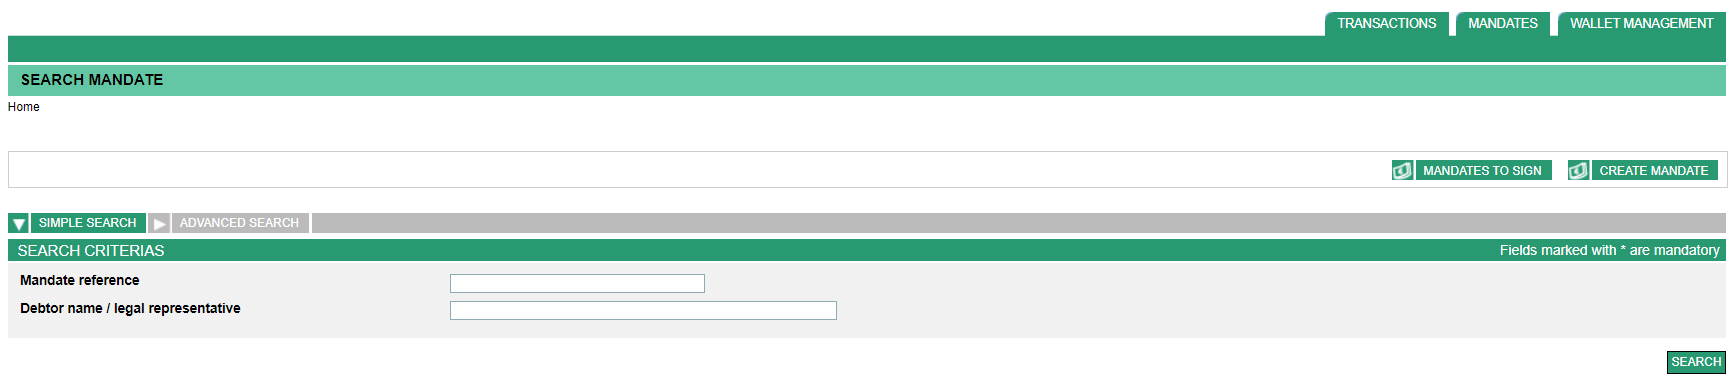
Searching for a mandate
Click on the  tab.
tab.
The following page will display:
Two search methods are possible:
Simple search
Click on the  tab to carry out a simple search. The following page
will display:
tab to carry out a simple search. The following page
will display:

Fill in the following fields:
- The mandate reference:
- Enter the complete reference of the mandate (18 digits, e.g. 000000000000000079)
- Or enter only the part on the right (e.g. 79), it will be automatically completed with the zeros missing on the left.
- The name of the debtor
After entering the search criteria (at least 1 criterion must be
entered), click on the button.
A list of mandates will display, depending on the criteria entered:

Advanced search
Click on the  tab to carry out an advanced search. The following
page will display:
tab to carry out an advanced search. The following
page will display:
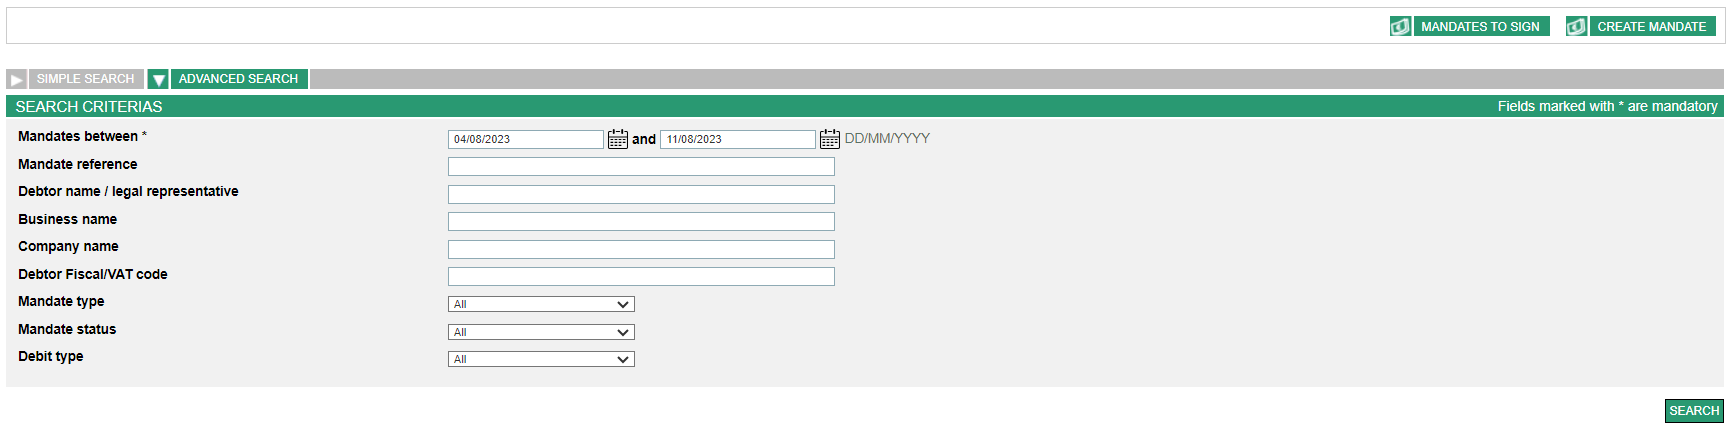
Fill in the following fields:
- The date of the mandates: you must enter the start date and end date of the search. The date requested corresponds to the signature date of the mandate.
- The mandate reference:
- Enter the complete reference of the mandate (18 digits, e.g. 000000000000000079)
- Or enter only the part on the right (e.g. 79), it will be automatically completed with the zeros missing on the left.
- The name of the debtor
- The mandate type
- The mandate status
- The type of direct debit
After entering the search criteria (at least 1 criterion must be
entered, at least the date), click on the button.
A list of mandates will display, depending on the criteria entered:
- Results can be sorted by clicking on the headers of the relevant columns.
- The list of mandates can be viewed in an Excel spreadsheet. To do
this, click on the button.
The following spreadsheet will display:

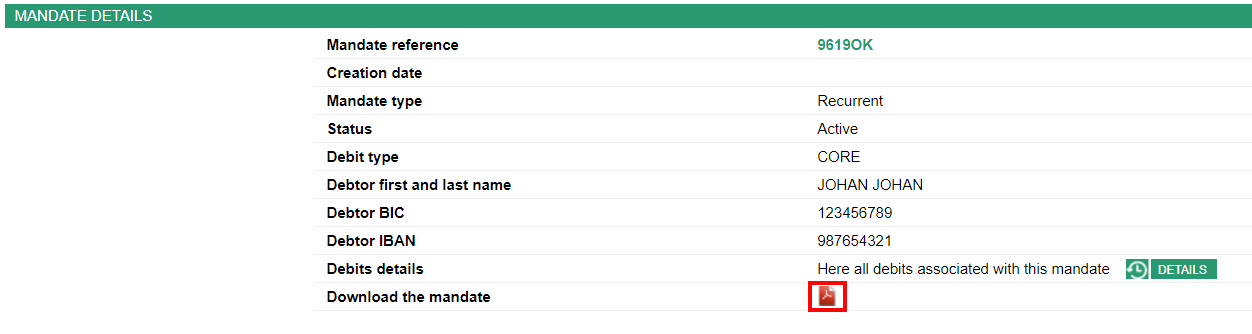
- To view the details of a mandate, click on the mandate reference.
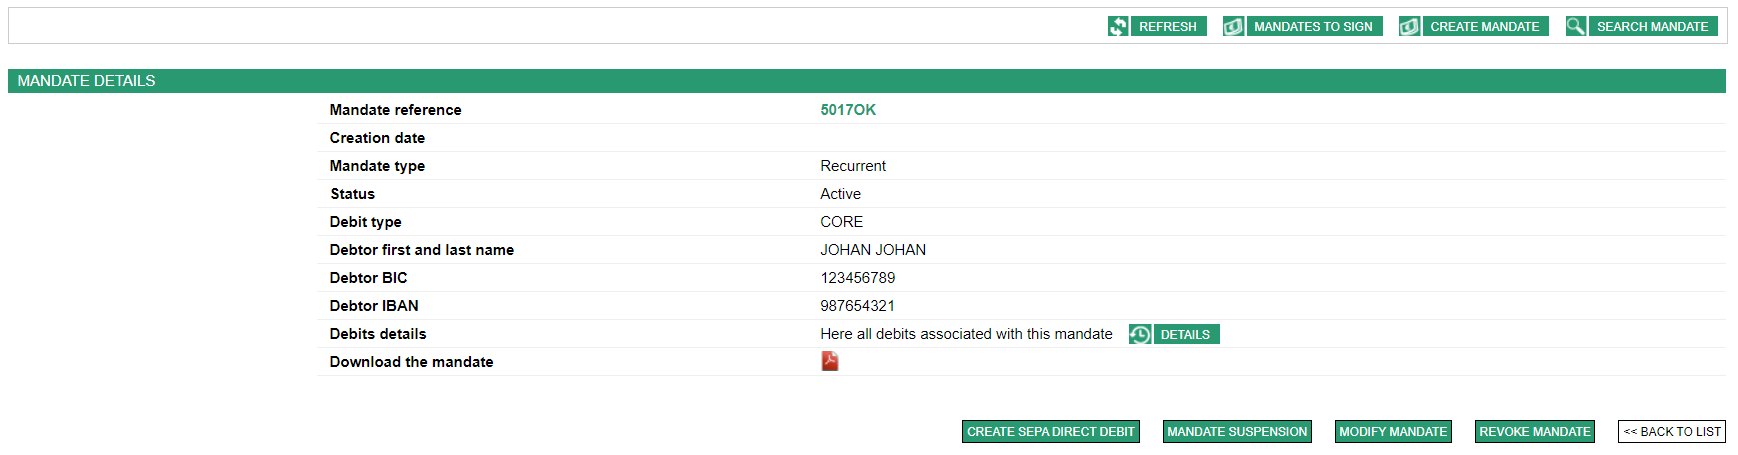
To view the direct debit history of a mandate, click on  .
.
The direct debit history page is as follows:

Click on to return to the original list.
Click on  to return to the original mandate.
To view the details of a direct debit, click on the ID of the corresponding direct debit. A redirection to the "Transactions" tab will display the details of the SEPA Direct Debit.
To return to the details of the mandate; click on the "mandate reference" link. To return to the direct debit history, click on the "debit identifier" link.
Managing and acting on a mandate
Having carried out a search to find the mandate you want to act on, a list of mandates corresponding to the search criteria entered will display:
Various actions can be performed on each mandate, these operations are available or not depending on the status of the mandate:
| Action | Explanations | Associated button in the list of mandates (vert = operation is available; grey = operation is unavailable) |
Associated button in the mandate details (not shown is action is unavailable) |
|---|---|---|---|
| Create a SEPA Direct Debit Mandate | - | |
- |
| Activate | You can activate a newly created mandate. |   |
|
| Modify | - |  |
|
| Suspend | You can suspend an active mandate. | |
 |
| Reactivate | You can reactivate a suspended mandate. | |
 |
| Revoke | You can revoke an active mandate, i.e. remove it from the mandate database. This means you will not be able to carry out any actions on this mandate, either in terms of management or creation of direct debits. You will therefore only be able to view the mandate and the associated SEPA direct debits for 14 months. |   |
 |
Click on the appropriate button depending on whether you are on the mandates list or mandate details view.
Activating a mandate
Having clicked on the activation button of a mandate in the results
list or on the button in the selected mandate details,
the following page will display:

Please enter :
- The mandate signing date.
- The city where the mandate was signed.
Click on to activate the mandate. The following page will
display:
Click on to return to the original list.
Click on to return to the original mandate
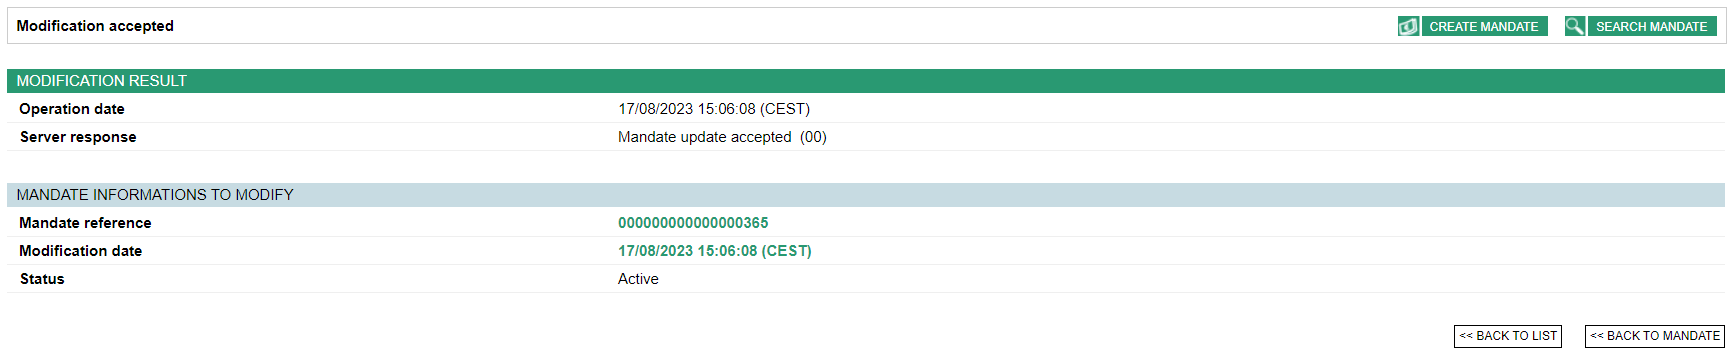
Modifying a mandate
Having clicked on the modification button of a mandate in the results
list or on the button in the selected mandate details,
the following page will display:
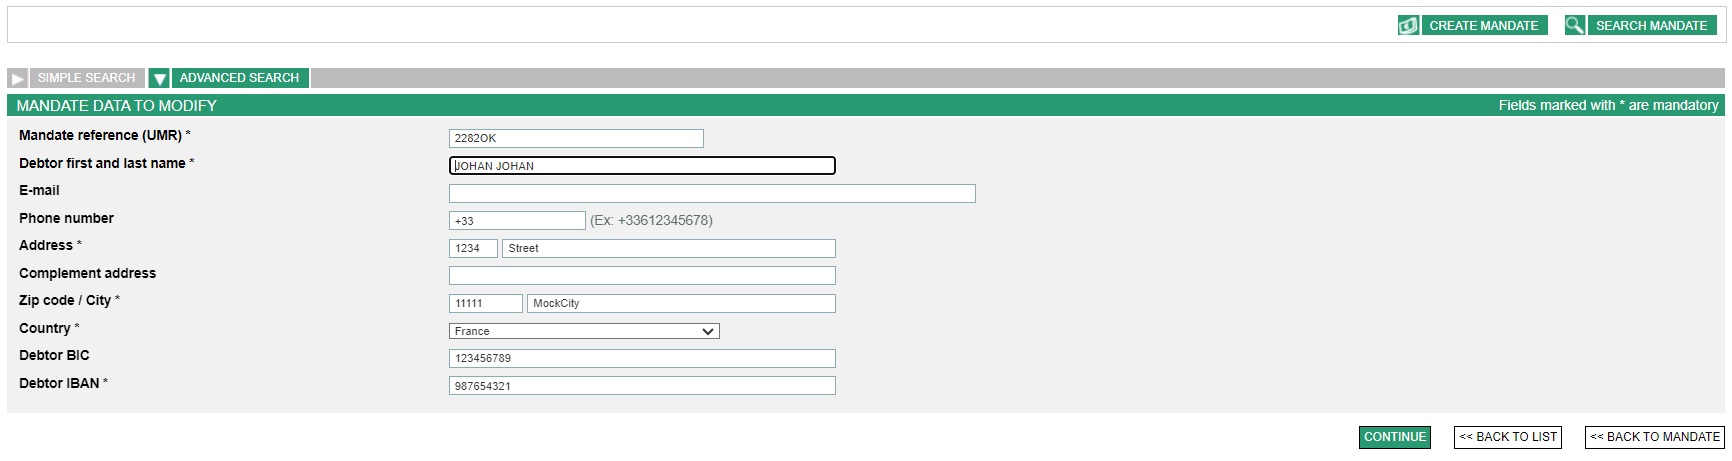
Update fields as necessary then click on the button.
The mandate modification confirmation page will display:
Suspending a mandate
Having clicked on the suspension button of a mandate in the results
list or on the button in the selected mandate details,
the following page will display:

Click on the  button to display the following page:
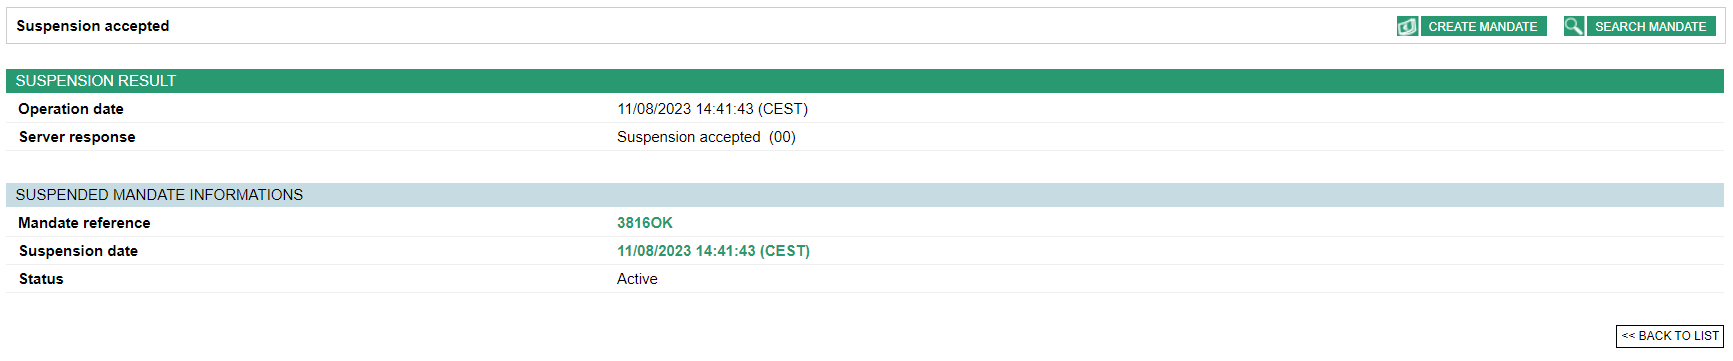
Click on to return to the original list.
Click on to return to the initial mandate.
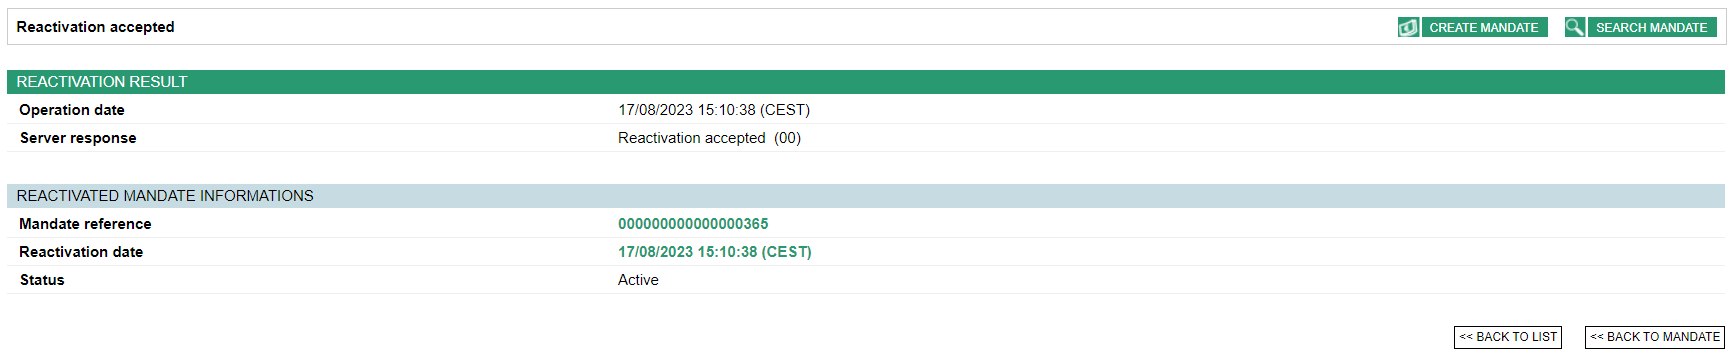
Reactivating a mandate
Havaing clicked on the reactivation button of a mandate in the results
list or on the button in the selected mandate details,
the mandate reactivation confirmation page will display:
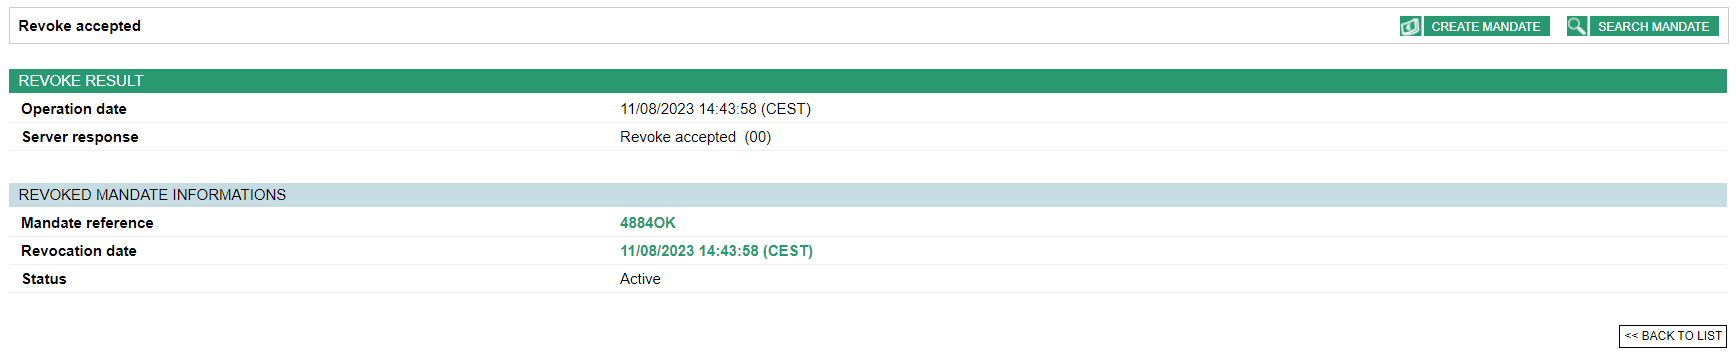
Revoking a mandate
Having clicked on the revoking button of a mandate in the results
list or on the button in the selected mandate details,
the following page will display:
Printing a mandate
You can download and print a mandate by going to the mandate
details page then clicking on the ![]() icon next to "Download the mandate".
icon next to "Download the mandate".
Using grey lists
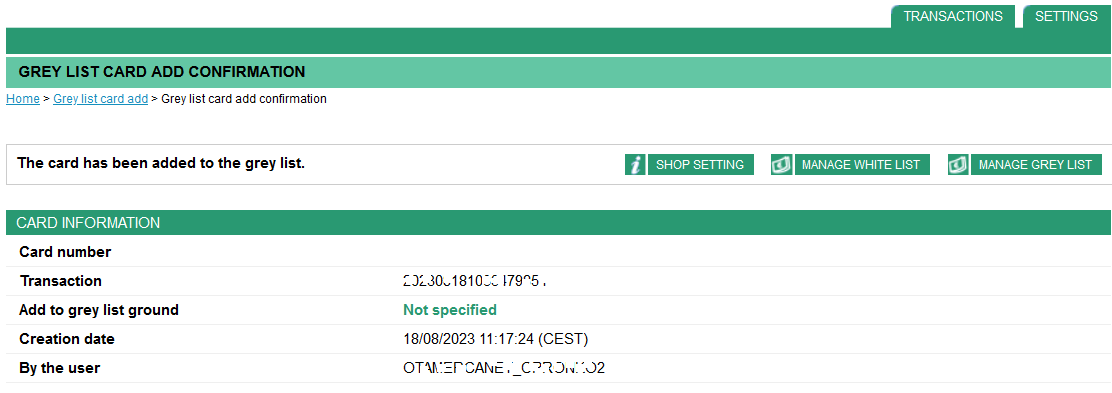
Adding a card number
Click on the  tab. The following page will display:
Click on the  tab to have the following page displayed:
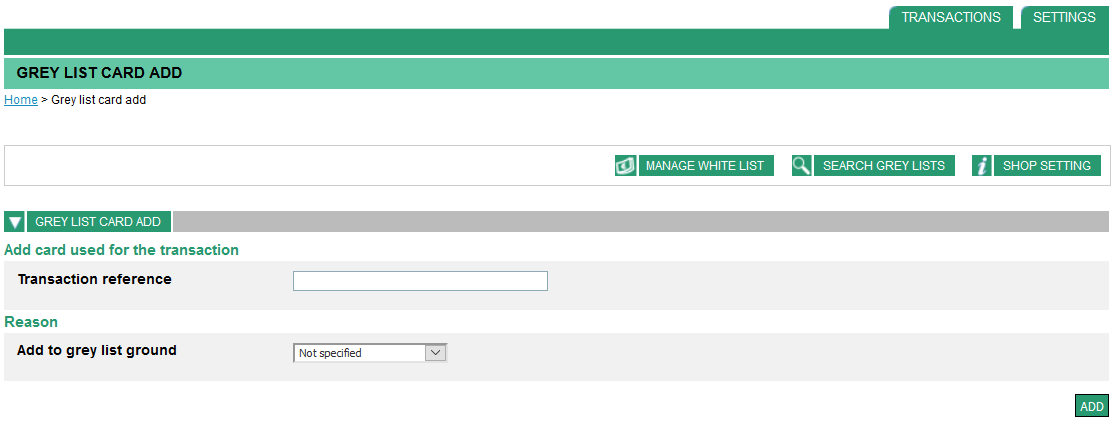
Two methods can be used to add a card number to a grey list:
Method 1: entering the references of a transaction already processed
Please fill in:
- The transaction reference.
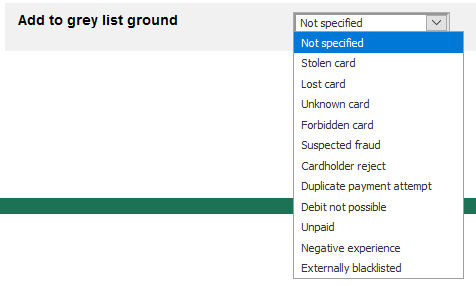
- The reason for greylisting the card (select from the dropdown list).
Then click on  to validate the addition of the card number to the
grey list.
to validate the addition of the card number to the
grey list.
The following page will display if the addition has been accepted:
If the addition has been refused, a refusal page like the one shown below will be displayed:
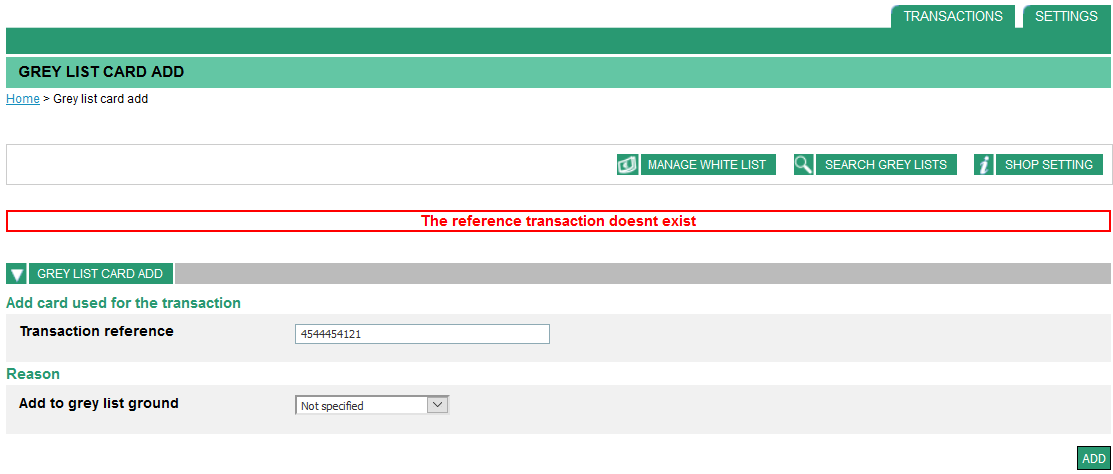
or
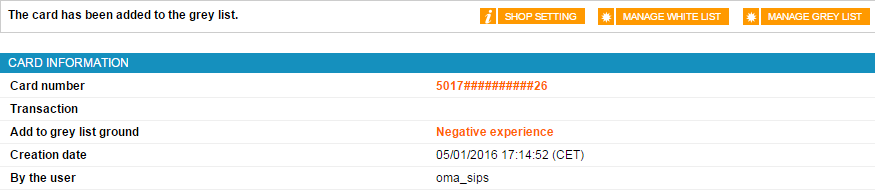
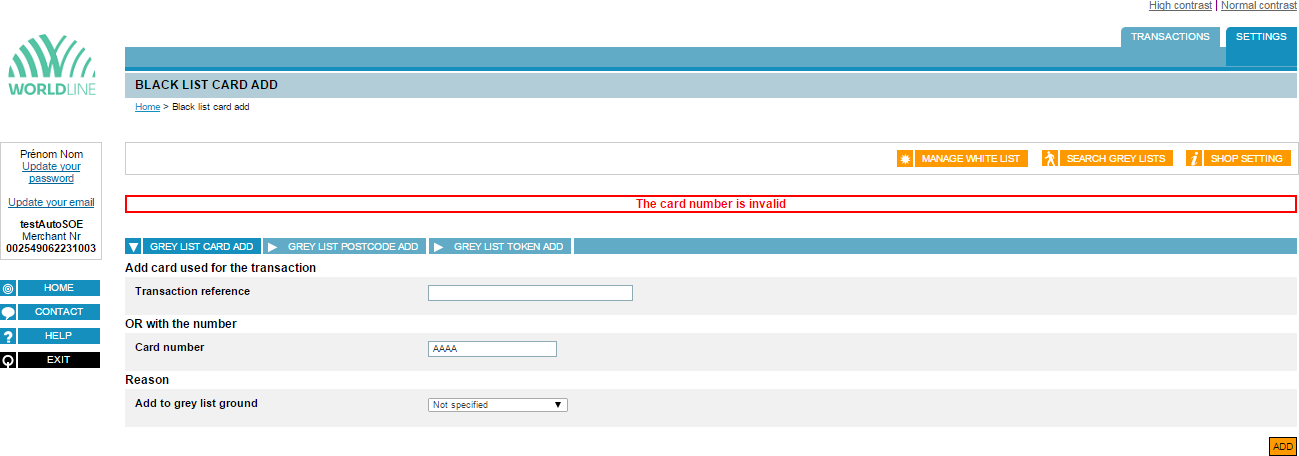
Method 2: entering a card number directly
Please fill in:
- The card number.
- The reason for greylisting the card (select from the dropdown list).
Then click on to validate the addition to the grey list.
If the addition has been accepted, the following page will display:
If the addition has been refused, below is a sample refusal page:
Viewing a card number
click on the tab. The following page will display:
click on the  tab to have the following page displayed:
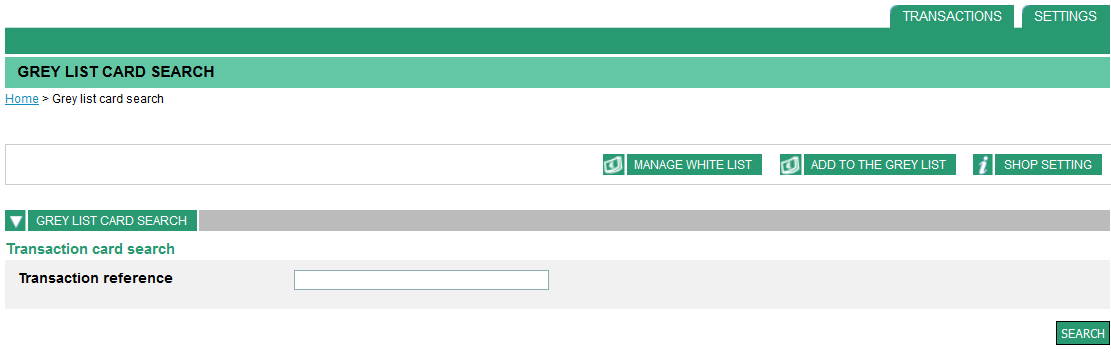
Two methods can be used to view a greylisted card number:
Method 1: entering the reference of a transaction
Define the following search criterion:
- The transaction reference.
Once you have defined this criterion, click on .
If the transaction has been found, the following page will display:
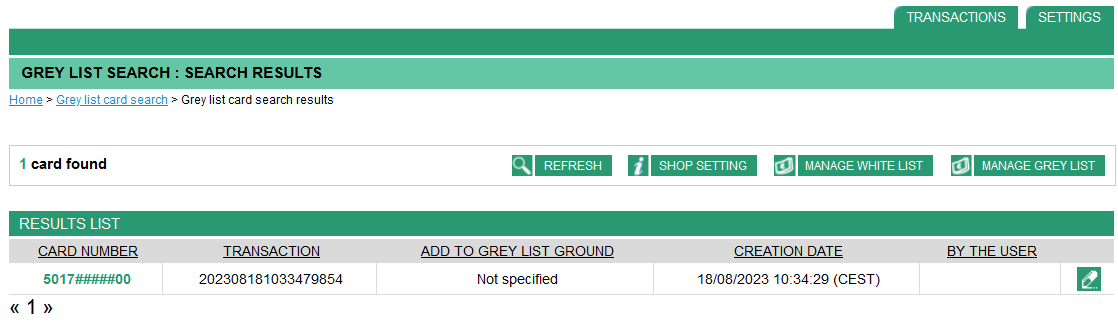
The right-hand part of the table shows the action that can be performed on a transaction for which the card has been greylisted.
Click on the  button to delete a transaction the card of which has
been greylisted.
button to delete a transaction the card of which has
been greylisted.
If the transaction has not been found, the following page will display:

or
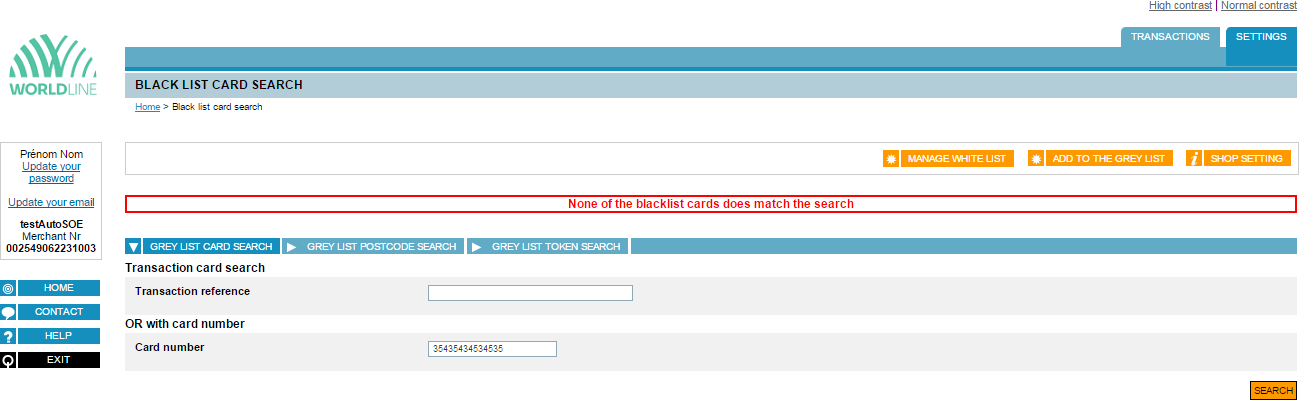
Method 2: entering a card number
Define the following search criterion:
- The card number.
Once you have defined this criterion, click on .
If the card has been found, the following page will display:
The right-hand part of the table shows the action that can be performed on a transaction for which the card has been greylisted.
Click on the button to remove a transaction the card of which that
has been greylisted.
If the transaction has not been found, the following page will display:
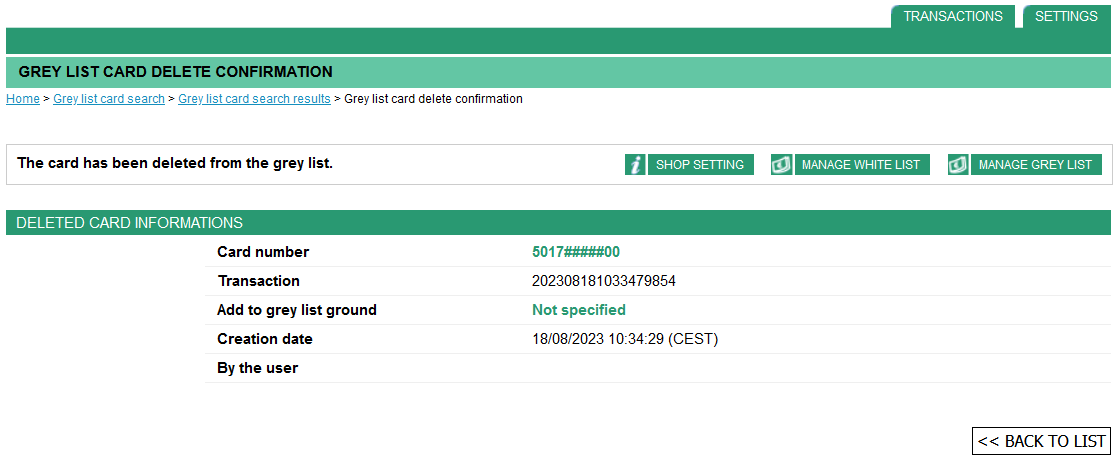
Deleting a card number
To delete a card number from a grey list, you must first search for a card number directly, or search for a card number from a transaction.
There are several possible methods for conducting such a search.
These various methods are described in the 'Viewing a card number' section.
The card number deletion method is the same regardless of the search method used.
A list of card numbers matching the defined criteria will display:
Click on the button to delete the card number from the grey list. The following page will display:
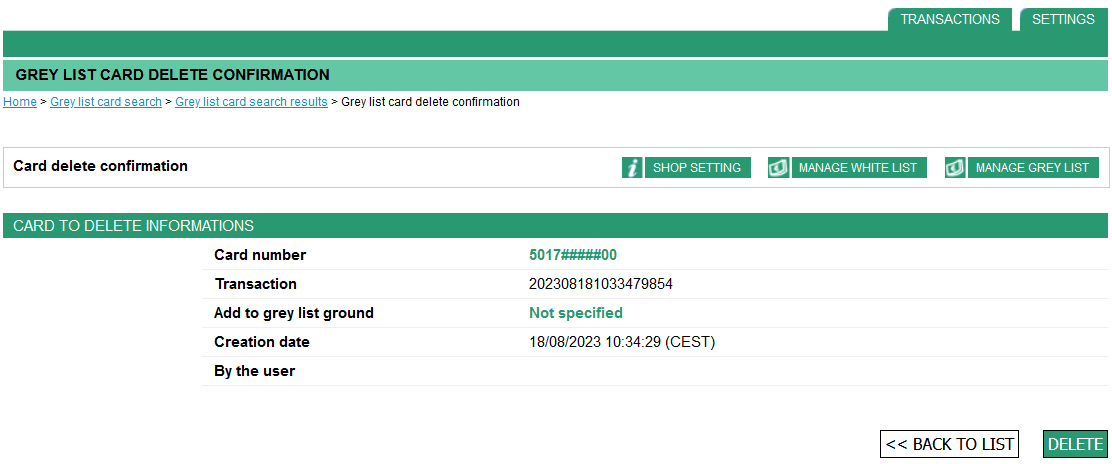
Click on  to confirm the deletion.
If the deletion has been successful, the following page will display:
Click on to return to the original list.
The following page will display:


